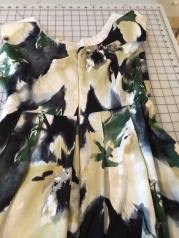
Pattern: Vogue Patterns American Designer, Kay Unger New York #V1353….continued from part 2 and part 1 Phew! It’s finally done. Actually, I do still need to buy a belt, but all the sewing is finished! Where we left off...okay I put the invisible zipper in. For those who don’t know, this is what an invisble zipper looks like. The teeth are not exposed on the outside, like a regular zipper, so the material is sewed around the front of the zipper tape. 

It really wasn’t that complicated, but there were a few minor beginner hiccups that I will share. I watched this video, which described the whole process perfectly. I didn’t have a proper invisible zipper foot, so I just used the cheap plastic foot pieces you get at the fabric store and it worked just fine.  I also wasn’t going to take any chances screwing this one up, so I made a bright colored basting stitch where the zipper was going to go, and pinned one side as the video instructed me. After I sewed the first side, it seemed right, but I had trouble zipping it up. It seemed twisted. Thinking I did the whole thing wrong, I un-did all the stitches and tried to figure out what the issue was. I couldn’t see what I was doing wrong, so I attempted stitching it again. It seemed right, until I tried zipping it up for the second time. I finally figured it out – the bottom of the zipper had just flipped to the inside, so it only looked like I pinned it wrong. Ooops! Oh well, I know for next time. After sewing both sides, the zipper flipped in with the material and indeed became invisible within the back seam. But all of a sudden I couldn’t zip the whole thing up to the top. This puzzled me for a bit, but after some examination found that I had just sewed one section too close to the teeth and the zipper was getting stuck. Minor fix – all set!
  I think it just needs a press so that the material is a little flatter around the zipper, but otherwise you can barely see it. Major learning: it is extremely important to sew as straight and close to the teeth as possible. This is where that plastic foot comes in handy since it actually has a groove that allows the foot to glide easily over the zipper teeth, keeping everything straight and tidy. This dress has a full lining in it, which attached at the neckline. The pattern also had me cut out a hem facing, which was to be sewn to the bottom of the dress. As I completed this step, I realized I was to hand sew along the top of the facing with embroidery floss, making a straight decorative stitch line above the hem. Nope! Not going to do that. For one, I’m not so comfortable with my embroidery skills. But mostly with this print, I didn’t think it would add anything. That would have been a lot of work so I opted to just sew the hem facing right
 to the lining skirt, keeping my stitches hidden. Unfortunately, this made the bottom look kind of like an open umbrella, with the bottom of the hem tightly pinned on the inside lining. I realized I had to keep the lining skirt free in order to keep the dress looking normal. I ended up cutting the hem facing and folding it up like a regular skirt hem, realizing this is what I should have done in the first place instead of bothering with the facing in the first place. I serged the ends of the lining skirt, since this was now hanging free, and then hand sewed the lining around the back zipper. The skirt looked a lot better with this simple fix. Below is the finished product! I will be adding belt thread loops and a purchased belt, preferably in a dark color. I will make sure to post a picture from the actual wedding.
  People have commented on the material, which is fantastic. I have to give a shout out to Sewfisticated Fabrics in Framingham, Massachusetts, where I got this wonderful material for an amazing price. I’m thinking I probably paid about $5 a yard.
See the final result in Dress-for-Wedding Challenge: Epilogue

Pingback: The Dress-for-Wedding Challenge: Part 2 | Threading Lightly
Pingback: The Dress-for-Wedding Challenge: Epilogue | Threading Lightly
I have bought this pattern so I was really interested to read the story (in three parts!) of its construction. I hardly ever buy new patterns but this one really caught my eye – I think because they used a really lovely fabric for it. So it was nice to see it in a different fabric – I really like the kind of inky splodgy look and the colours. I think the lining advice will be invaluable too. It would be nice to see it accessorised and being worn to the wedding. Lovely work.
LikeLike
Hope it was helpful! It would be interesting to try again, sewing the embroidery line that is mentioned in the pattern. I didn’t have the patience (or skill) this time around, but maybe another time. Post of the dress at the wedding is coming…stay tuned! The wedding was last Thursday, so I just need to go through my pictures.
LikeLike
Hi, I’ve nominated you for a Liebster award! If you are interested in participating you can find the details here:
http://justsewtherapeutic.wordpress.com/2014/06/21/a-liebster-award/
Enjoy the rest of your weekend!
Helen x
LikeLike
Wow! I’m so touched! Thank you so much. I will definitely participate and leave you the link with the answers to the questions very soon!
LikeLike
Thank you! The fabric is really sturdy and good quality, I would expect it would be pretty expensive at most fabric stores. It was one of those amazing finds…stumbled upon it by accident.
LikeLike
The dress looks absolutely beautiful, all your hard work has really paid off! The fabric is gorgeous too, it looks really expensive!
LikeLiked by 1 person