New skills acquired:
- Flat-Felled Seams
- Double Needle Action
I’ve been kind of down on my sewing lately. Things are just not coming out as nice as I want them and it’s been a frustrating few weeks. This could be why I haven’t been writing in my blog – I have been working on projects, but have no feelings of satisfaction. Also, it seems most visitors are getting to my blog by searching for “amateur in bikini” but that is another issue.
For the past few months I have been piecing together some corduroy pants, which I am affectionately naming Grape-Cord. I am using a blue jean pattern that I have actually made a muslin of way back in the early days of my blog. My biggest accomplishment to date is the fact that I can now spell corduroy without looking it up. No, just kidding, I’m having some wins on these.
What is working…

1. Adjusting the pattern for size
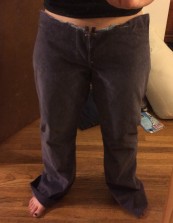
I have big hips and big thighs. There, I said it. It makes jean shopping a frustrating task that usually ends in tears and typical sewing patterns for bottoms don’t work so well. I end up making the size for my measurements and the crotch ends up around my knees. So I decided to try to adjust the pattern on this one. I added a good amount to the back in the hip/thigh area but made sure to keep the crotch in line with the size that matched my waist size. I was holding my breath the whole time I was cutting into the fabric. As I worked on these, I hoped and prayed they would fit. It was hard to tell by holding them against me and pinching the seam lines. When I finally sewed both front and back together and pulled them on, I was so relieved. The crotch could have used a little more adjustment, but it was definitely in the right place. And they fit around my bottom with even a bit of room to spare (bring on the fried chicken!). For a first attempt at fitting a pattern, I think I did quite well.

2. The fly
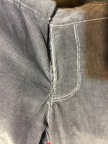
I guess practice makes perfect on this one – I felt it all came together pretty smoothly this time around. I knew which areas to serge ahead of time to get that finished look and there doesn’t seem to be any issues with the zipper.
Okay I can’t take too much credit for this, since I used my mother’s super-machine with it’s embroidery stitches. I went through a lot of practice pockets to figure out what design I wanted and I’m pretty terrible with decorative things like this. But I’m very happy with the results – simple yet stylish.
4. Double needle
Yeah! This was my first time using a double needle on my machine – and it worked way better than I expected (and with top-stitching thread too!). I even think my fly top-stitched curve looks pretty sharp – I really don’t think I could do better than that. I actually think I did better on the curve than I did with just straight lines. 
Threading this on my machine was extremely easy – the only issue was that I only have one spool holder (I’m sure there is a technical term for this that I don’t know). My mom informed me there is something that attaches on – I will have to look for this at some point. I put the spool on the bobbin winder which worked surprisingly well, although I did knock it off a few times. I think I will wind a bobbin with the thread and use that for my next attempt, since the spool didn’t quite fit properly.
I Felled Flat
So yeah, flat felled seams. I was very excited to be using this technique for the first time. They seem so simple to master. And even while I was making them, I thought everything was going well. But when I looked at the result, they were far from perfect. Sometimes small sections would untuck itself out of nowhere, making me have to undo and redo, which only seemed to make it more unravel-ly. I had started these on the yoke….yuck. There is definitely some unevenness. Pair that with some messy top stitching and you get…yuck. Well from a distance it’s not so bad.
More practice on flat felled seams is definitely in order – I will master this! The seams are all flat felled with the exception of the outer side seams, since it’s impossible to do this (or at least I can’t figure it out). I knew this ahead of time from studying many a blue jeans, so I made sure to serge-finish those edges before I sewed them up.


For those of you that do not know how to do a flat-felled seam, I don’t think I can describe it better than some of these tutorials – here and here. The main thing to know is that you need to start with WRONG sides together. And be sure to have a big enough seam allowance to fold it over so it won’t unravel. Oh and be extra careful when cutting that one side – one small slip and the whole thing can be ruined. I had high anxiety over this the whole time.
For the most part, I really like this pattern. The directions are pretty straight forward and there were not a lot of HUH? moments. The only part that is unclear is the waistband. Even with my second attempt I am still at a loss as to how this is supposed to work. I will get into that for part 2 – the finishing! I may use this pattern again, now that I’ve adjusted the fit a bit – although I think I am on the look out for a new jeans pattern. Any suggestions?
This is definitely a work in process. I’ve slowly been working on these while I attempt other projects. Stay tuned for part 2 and the finished result!

Curious about how it all turned out? Click here to read part 2!


Pingback: Tanks for everything: the Aurora top | Threading Lightly
You got a lot farther than I did. I cut out the pieces and I just can’t figure out how the back pieces are supposed to fit together–pieces 9, 8 and 17 seem like they are completely unrelated different sizes! Oh, pants.
LikeLike
Pingback: Striking a new corduroy: part 2 | Threading Lightly
Lots of learning there, and they are looking good, I would say. I shy away from pants as they are quite hard to fit, and RTW is better for me. I have not mastered the double needle stitch yet myself. One day.
LikeLiked by 1 person
Pants are EXTREMELY hard to fit – I spent so much time fitting these and they are still not perfect. I usually end up making a pair, then get so frustrated with the amount of time and the fit issues that I don’t make another for a long while. But then I forget and really want to try again. RTW pants are a tough fit for me as well, so I’d like to get good at making pants. I just need more patience (and time) I think. :o)
LikeLike
I have that pattern. Thanks for showing it to us. I have another jeans pattern, McCalls M5894. I’m not sure which one to do!
LikeLike
I did like this pattern, except for the waistband. I’ve been doing some reading and I think I need a curved waistband – something to possibly draft for next time.
LikeLiked by 1 person