
Pattern: Sewaholic Crescent Skirt
New Skills Acquired:
- Bound seams
Well I don’t know what happened. I got super busy in August and  September and put my sewing on hold. Then all of a sudden it was December and I hadn’t gone near my blog, not even to read posts from my favorite bloggers. It’s not like I haven’t been sewing – I have been working on projects here and there when I find a spare weekend. In fact this skirt I am writing about was actually made in September and I had even started a post about it. Well these things happen. Sometimes you get so focused on the constant making that you don’t take a step back to write and reflect on what you have accomplished. I felt so behind in the projects I wanted to finish this summer that I kept pushing through and I let my laptop collect dust. But now we return to our regularly scheduled blog post, already in progress…..
What a difference the right pattern makes! With my last skirt a fitting failure, and the one before not so perfect either – I thought I was doomed to be bad at skirts. It just goes to show with the right pattern everything can come together. I had bought this embroidered fine wale corduroy with the intention of making a skirt. The Crescent skirt pattern from Sewaholic seemed to be a perfect choice since it’s designed to fit pear-shape body types like mine. I didn’t have the patience to take it for a test drive so I just went with the measurements on the package and cut. It’s actually pretty amazing that this worked out as well as it did.
Out of Pocket
I was a little nervous when I read there was side pockets. I even tried to work out a way to not include them. But the way these are constructed, they do not make the skirt bulky at all. And they’ve come in handy a few times – such as having to stash my phone someplace at a work function.
I opted for the french seam method that was mentioned in the online tutorial. It was just a few extra steps to get a nice finish on the inside. As with the Granville shirt pattern I attempted, I highly recommend looking at the online tutorials as the pictures and step-by-step directions really set you up for success. The pocket openings are side slits, but they are not on the side seam so they do not stick out at all – even with wide hips. The waist band is also tapered in a way to fit my shape perfectly – no embarrassing gaps. Wow, I just love this pattern.

I’m Bound to be a Success
Since I was working with corduroy, I needed a way to finish my seams nicely. I figured french seams all around might cause some extra bulk on the side seams which is something you don’t want when you have hips. I decided to try bound seams (sometimes called Hong Kong seams) where you wrap the raw edge of the seam in bias tape or fabric. I’ve been reading some blogs talk about Hug Snug, a washable rayon seam binding tape and I was curious to give that a try. The best part – it has woven edges that won’t unravel so I wouldn’t need to double fold it to finish my edge.
Like most people, I fell in love with Hug Snug as well. It irons beautifully and just seems to fall into place perfectly when you are shaping it around an edge. I made the mistake of not researching the best way to apply the tape. For my first attempt, I folded the tape around the raw edge, ironed around the seam and sew one stitch down the edge. This worked okay, but as you can imagine was not as neat as it could be and also it’s hard to catch both edges perfectly. I decided to do some research and found several methods for binding the seams. This website has some really great tutorials on how to use Hug Snug more efficiently. For this skirt I went with the “double-seamed method” which has you stitching twice, but it’s definitely worth it.

You start by bringing your raw edge to one side and placing the tape so the overhang is more than half the width. I pinned mine in place, but you may be able to get away with just holding it.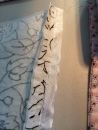
You stitch this in place along the edge so that you end up with a nice amount of tape sticking out the side. For the ends, fold these under.
Then just flip the overhang of tape around the raw edge, turn over and sew the other side, close to that edge.

Then repeat all these steps on the opposite raw edge and you will have your bound seams. Yes! Hug Snug is pretty lightweight so there really is no extra bulk. Plus it’s washable and seems to be indestructible. Time will tell on that I guess.

I am pretty amazed how perfect this skirt came out on the first try. The lesson here is to start using more independent patterns. But I am really loving Sewaholic because it’s designed for my lower half shape.

One modification I made was I put in an invisible zipper instead of a regular one. This was actually a mistake – I could have sworn it called for an invisible zipper and so that is what I bought. I tried it any way since I really like invisible zippers and it works fine for this pattern.

Okay, here is hoping I am back for good after this extended vacation from my blog. I have been finishing up a few projects these last few weeks, so it’s time to get typing!

Pingback: Take Two: 2023 edition – Threading Lightly
Very pretty! I have a few Sewaholic patterns and like them all.
LikeLiked by 1 person
welcome back. nice skirt. And cheery photograph.
LikeLiked by 1 person
Lovely skirt! Your work is wonderful, and I really appreciate following along as you learn new techniques. 🙂
LikeLiked by 1 person
Thank you so much :o)
LikeLike
Wonderful job and the skirt looks great on you. I’ve never tried that brand of pattern and will have to look for them.
LikeLiked by 1 person
Thanks – they have a lot of great patterns to choose from.
LikeLike