The Ultimate Adventure: Creating my dream wedding dress

It’s been awhile for me on this blog. I’ve clearly been busy in life, trying to keep my head above water with work and various life changes. I’ve lost touch with friends, my house is a total mess and I’m so behind on projects it’s not funny. I have done some sewing and even finished some great clothes, but every time I go to write something, I get distracted. I’m hoping to pick things back up in the new year to write about my backlog, but in the meantime I wanted to mention my one major project that was the ultimate challenge in my whole sewing life. I am talking of course, about making my own wedding dress.

Back when I was first sewing, I remember being proud of my ambitious (at the time) project of making a dress that I was going to wear to a wedding. That seemed scary enough. Making my own wedding dress? That seemed like something other sewists did, ones that are imaginative and innovative or can draft their own patterns. Ones who have a sloper ready to be used. Ones who actually know what a sloper is (still learning here). Could I, with my amateur sewing skills, actually make something I would be proud to walk down the aisle in?

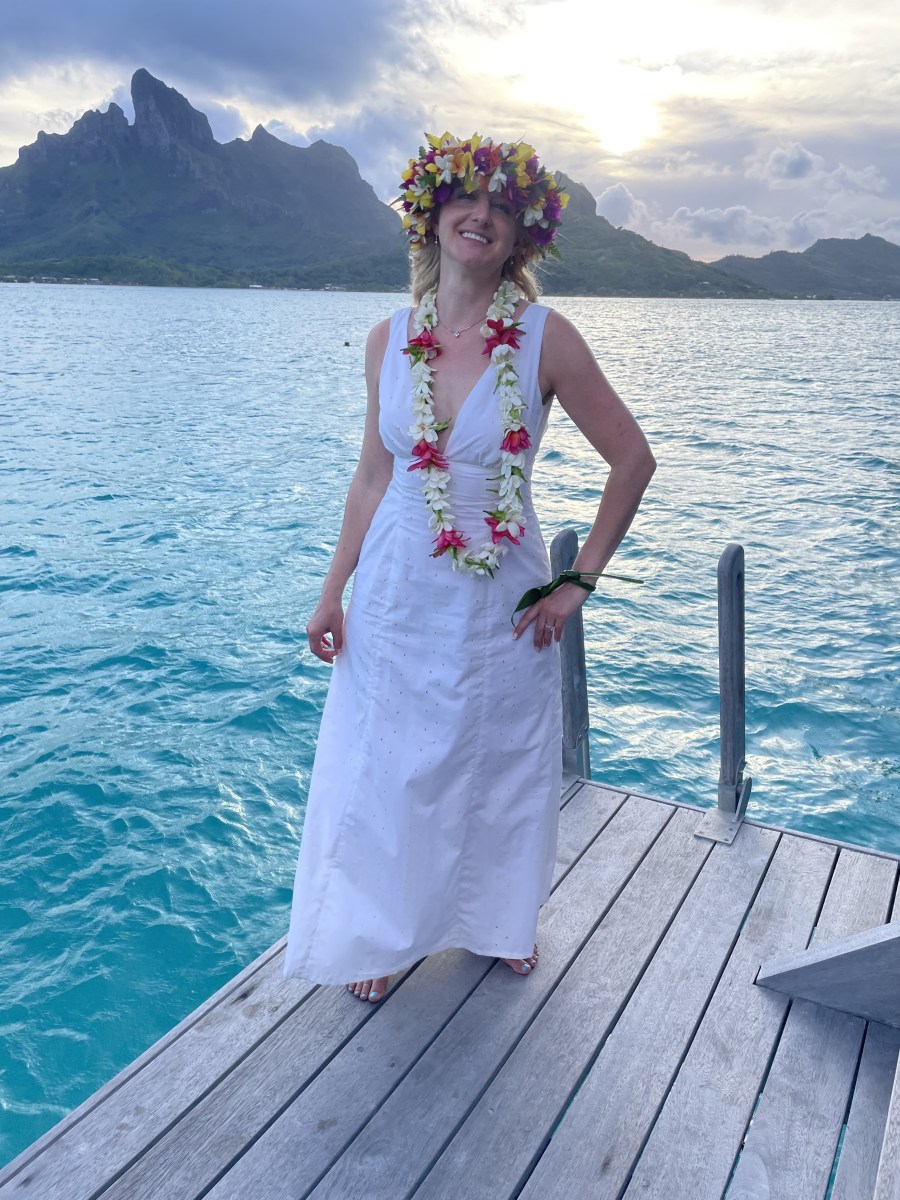
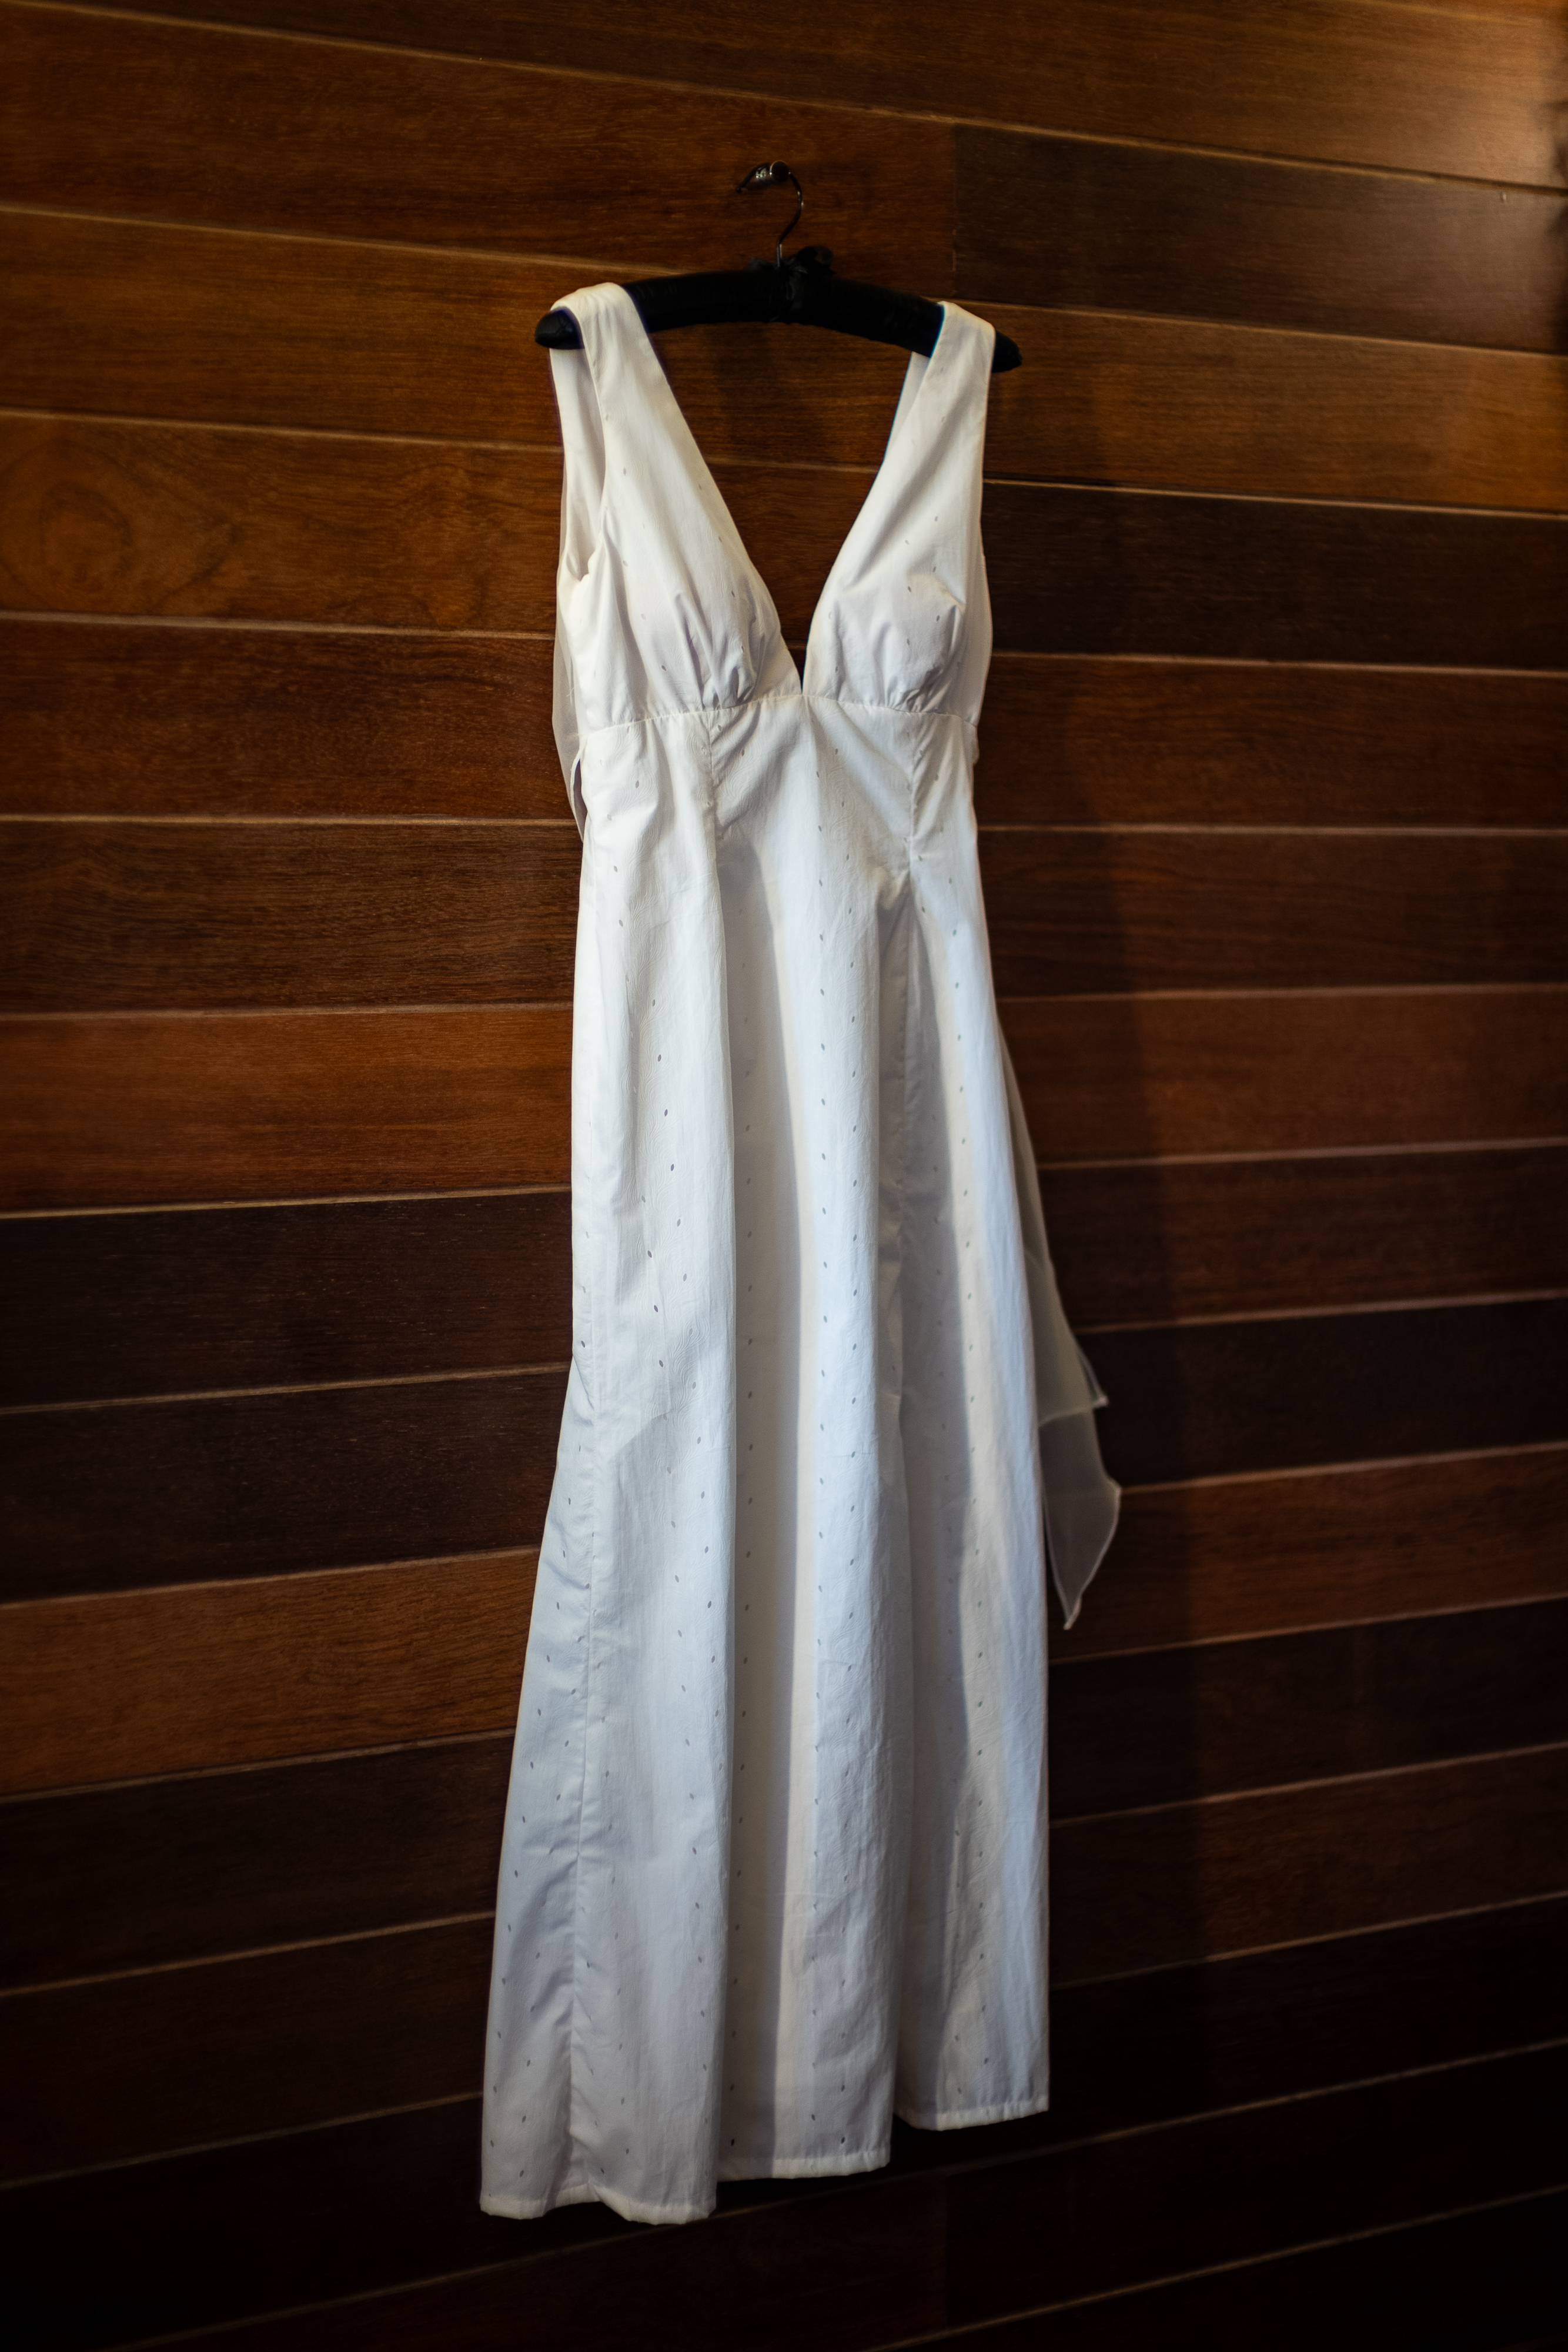
Before I go into the details on the dress, I want to mention that my wedding was an elopement. Years ago, I got married and had the wedding with all the family. I bought a poofy dress that I loved and did all the traditional things. That marriage didn’t work out so for my second wedding, I knew I just didn’t have the energy (or the money) to plan a whole thing again. My husband and I decided to combine our wedding and honeymoon into one trip, to a place I’ve always wanted to go – Bora Bora in French Polynesia. I wanted to get married on a beach where I only had to worry about myself and my partner while we vowed to share our lives. An occasion like this calls for a more simple dress – or at least that is what I wanted. Something that was not too elaborate that would distract from the natural beauty around us. I found out it’s hard to find a dress that’s simple but still makes sense in wedding photos. I thought maybe if I made something, it would represent what I wanted more (however I did buy a back up dress just in case this ended up being a total disaster).

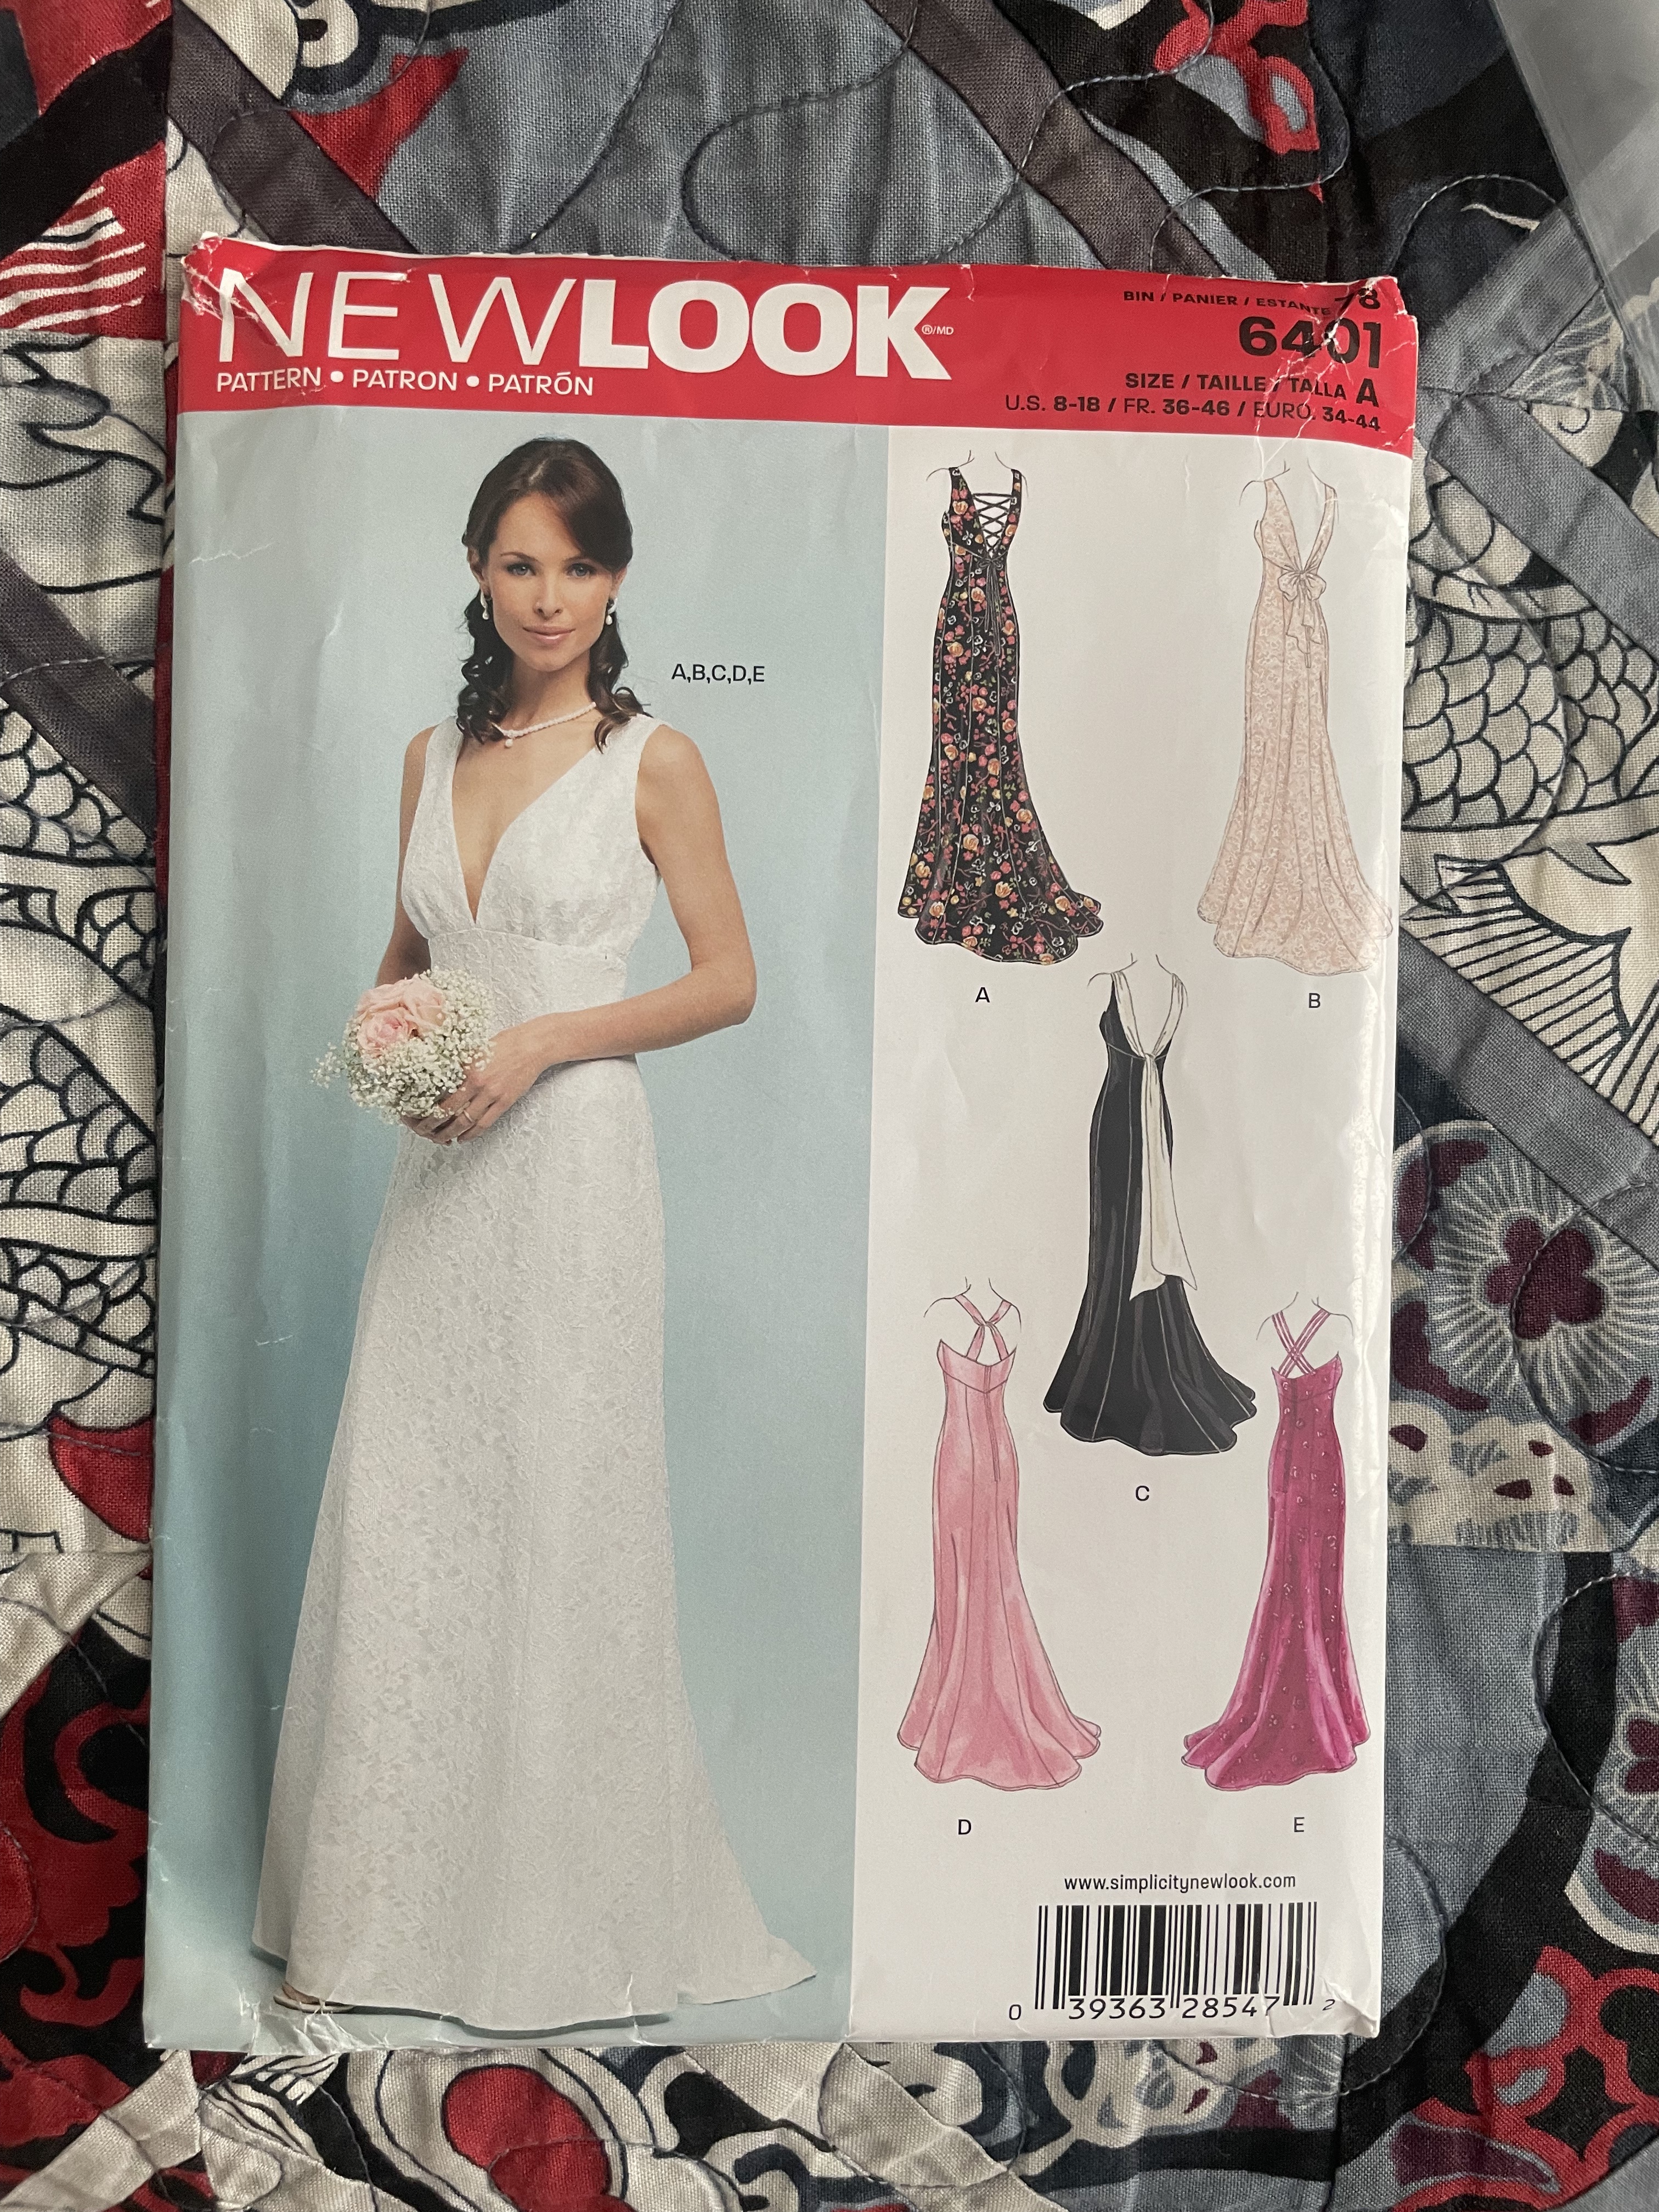
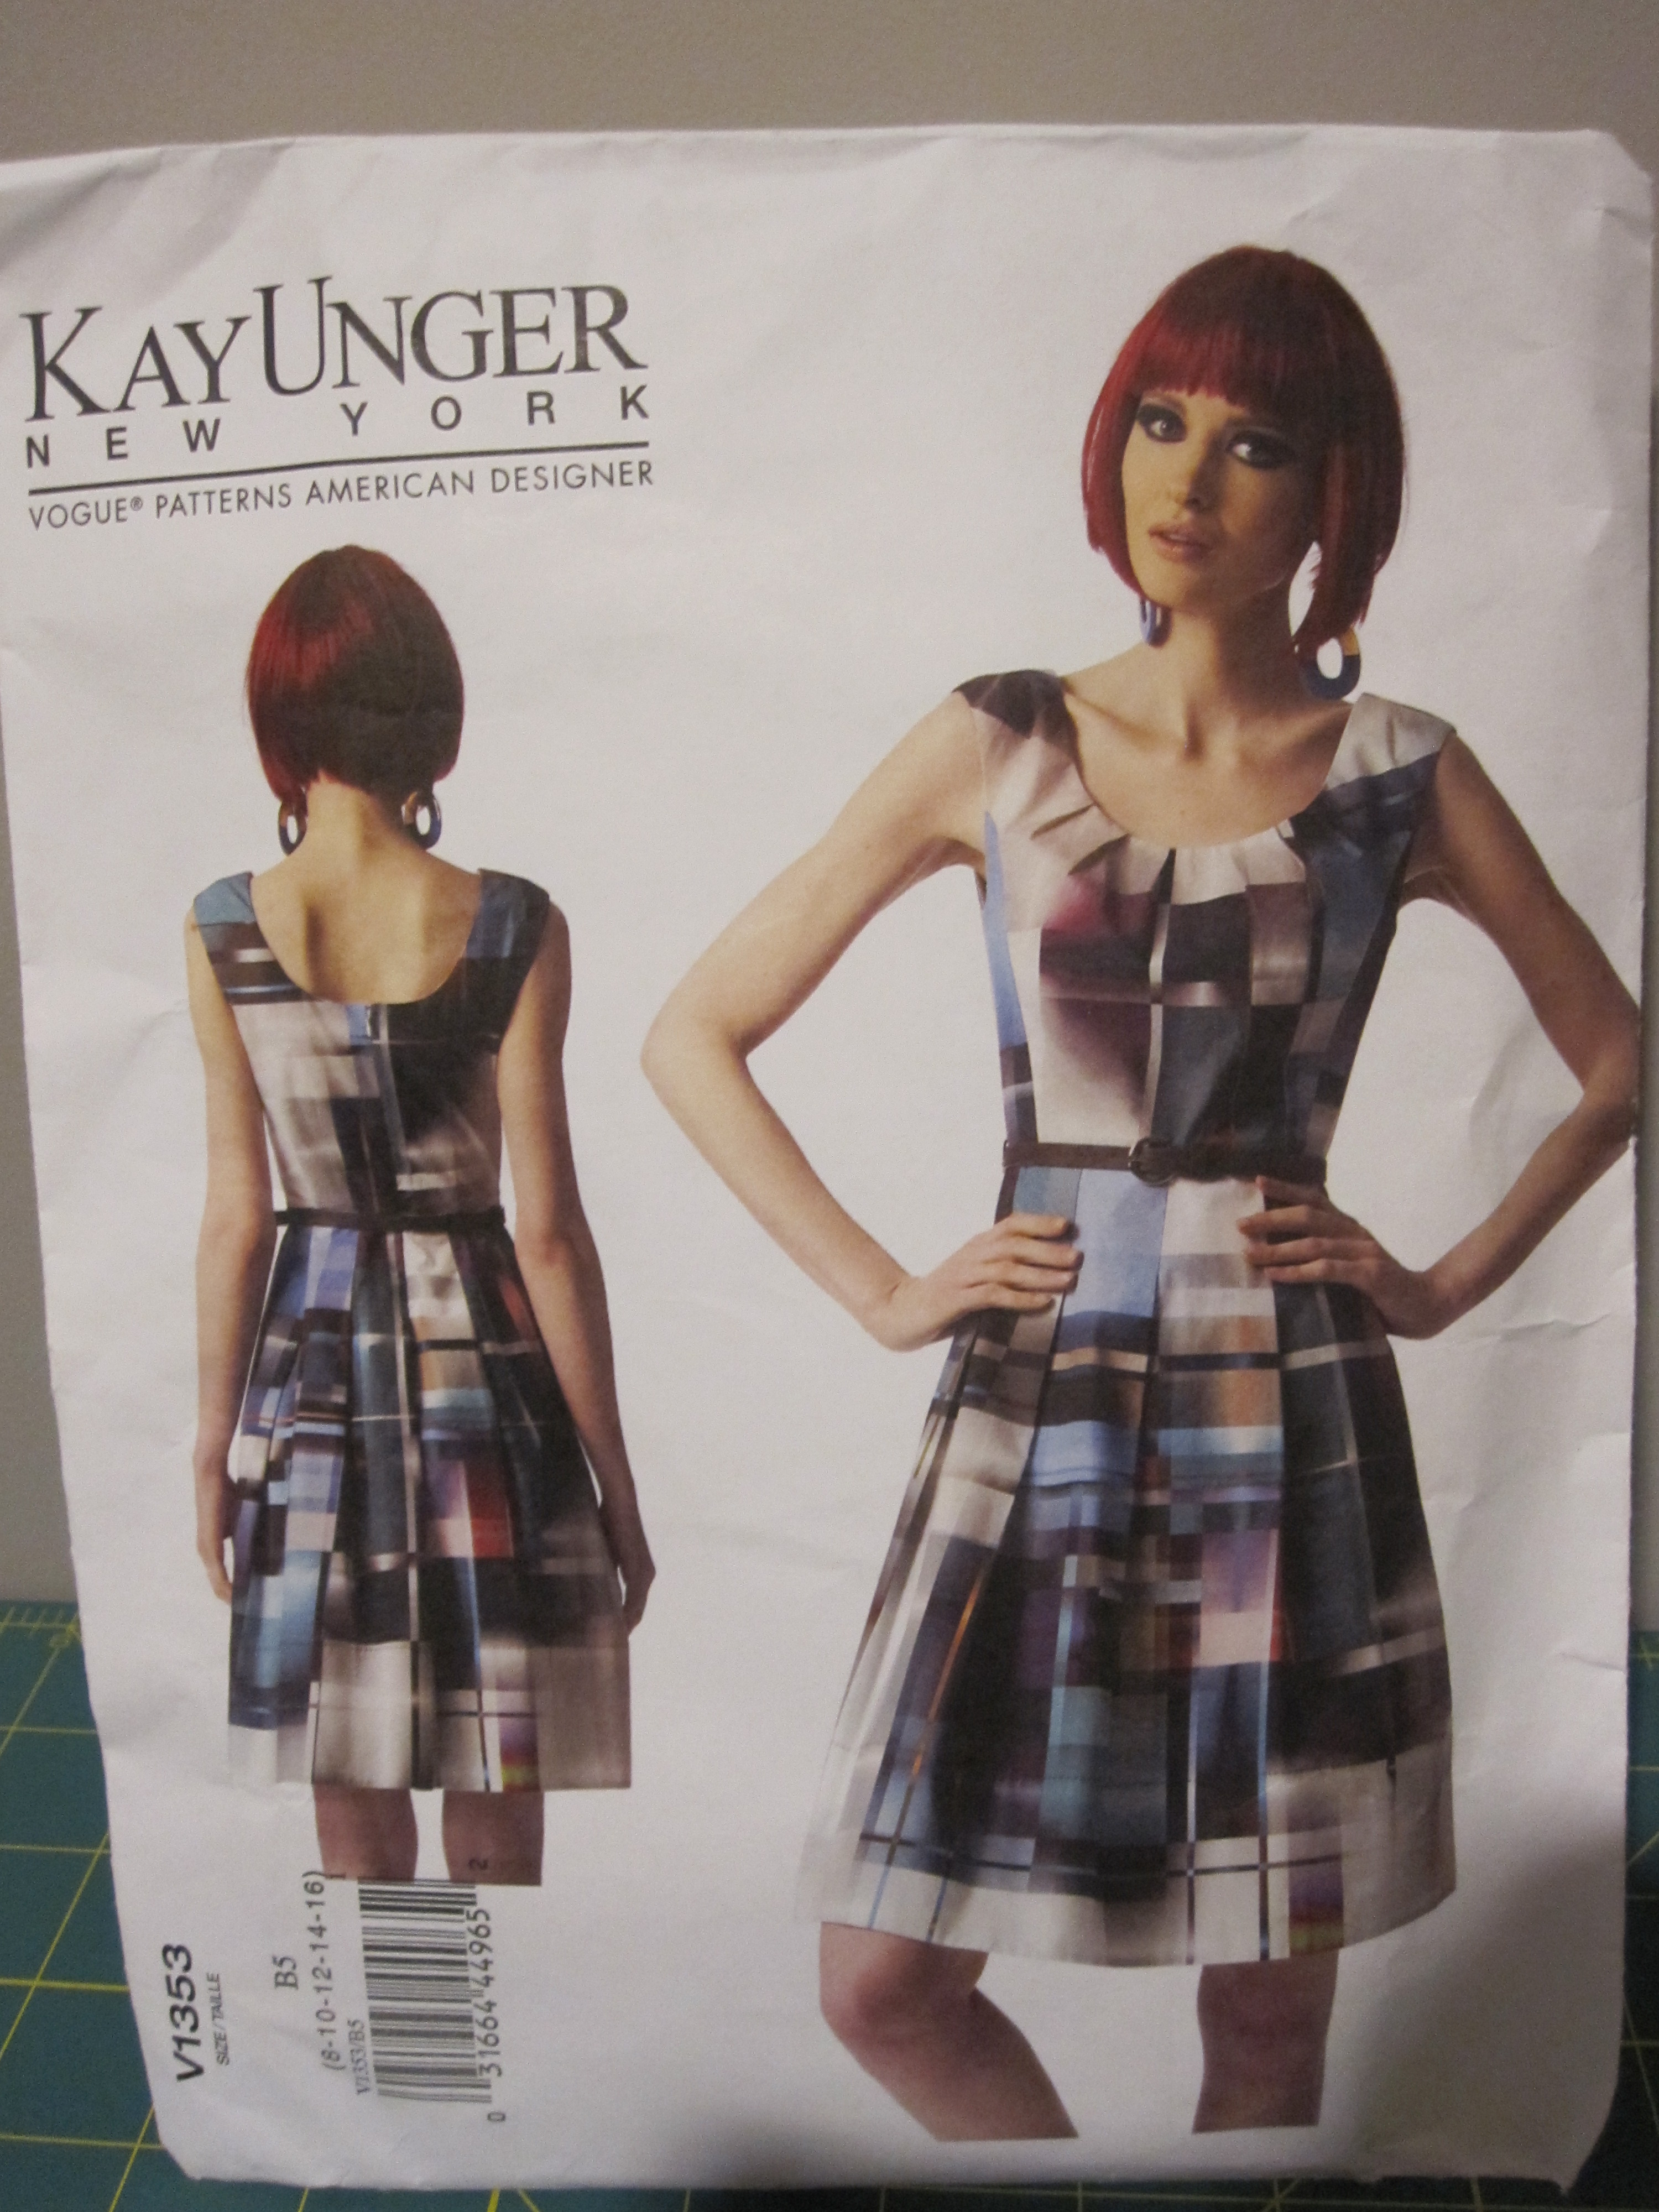
My skills may be a bit better than when I made that first dress for that wedding, but I still knew my limitations. This was too important an occasion to just go it alone, so I enlisted my mother to help me. It was great to have another person there to interpret the directions and bounce ideas off of. The first step was picking a pattern. I had a few wedding-like dress patterns in my collection and I settled on New Look 6401 (view B). I liked the simple design and since it didn’t seem to have a lot of pieces, I was hoping there was less of a chance of a screw up.

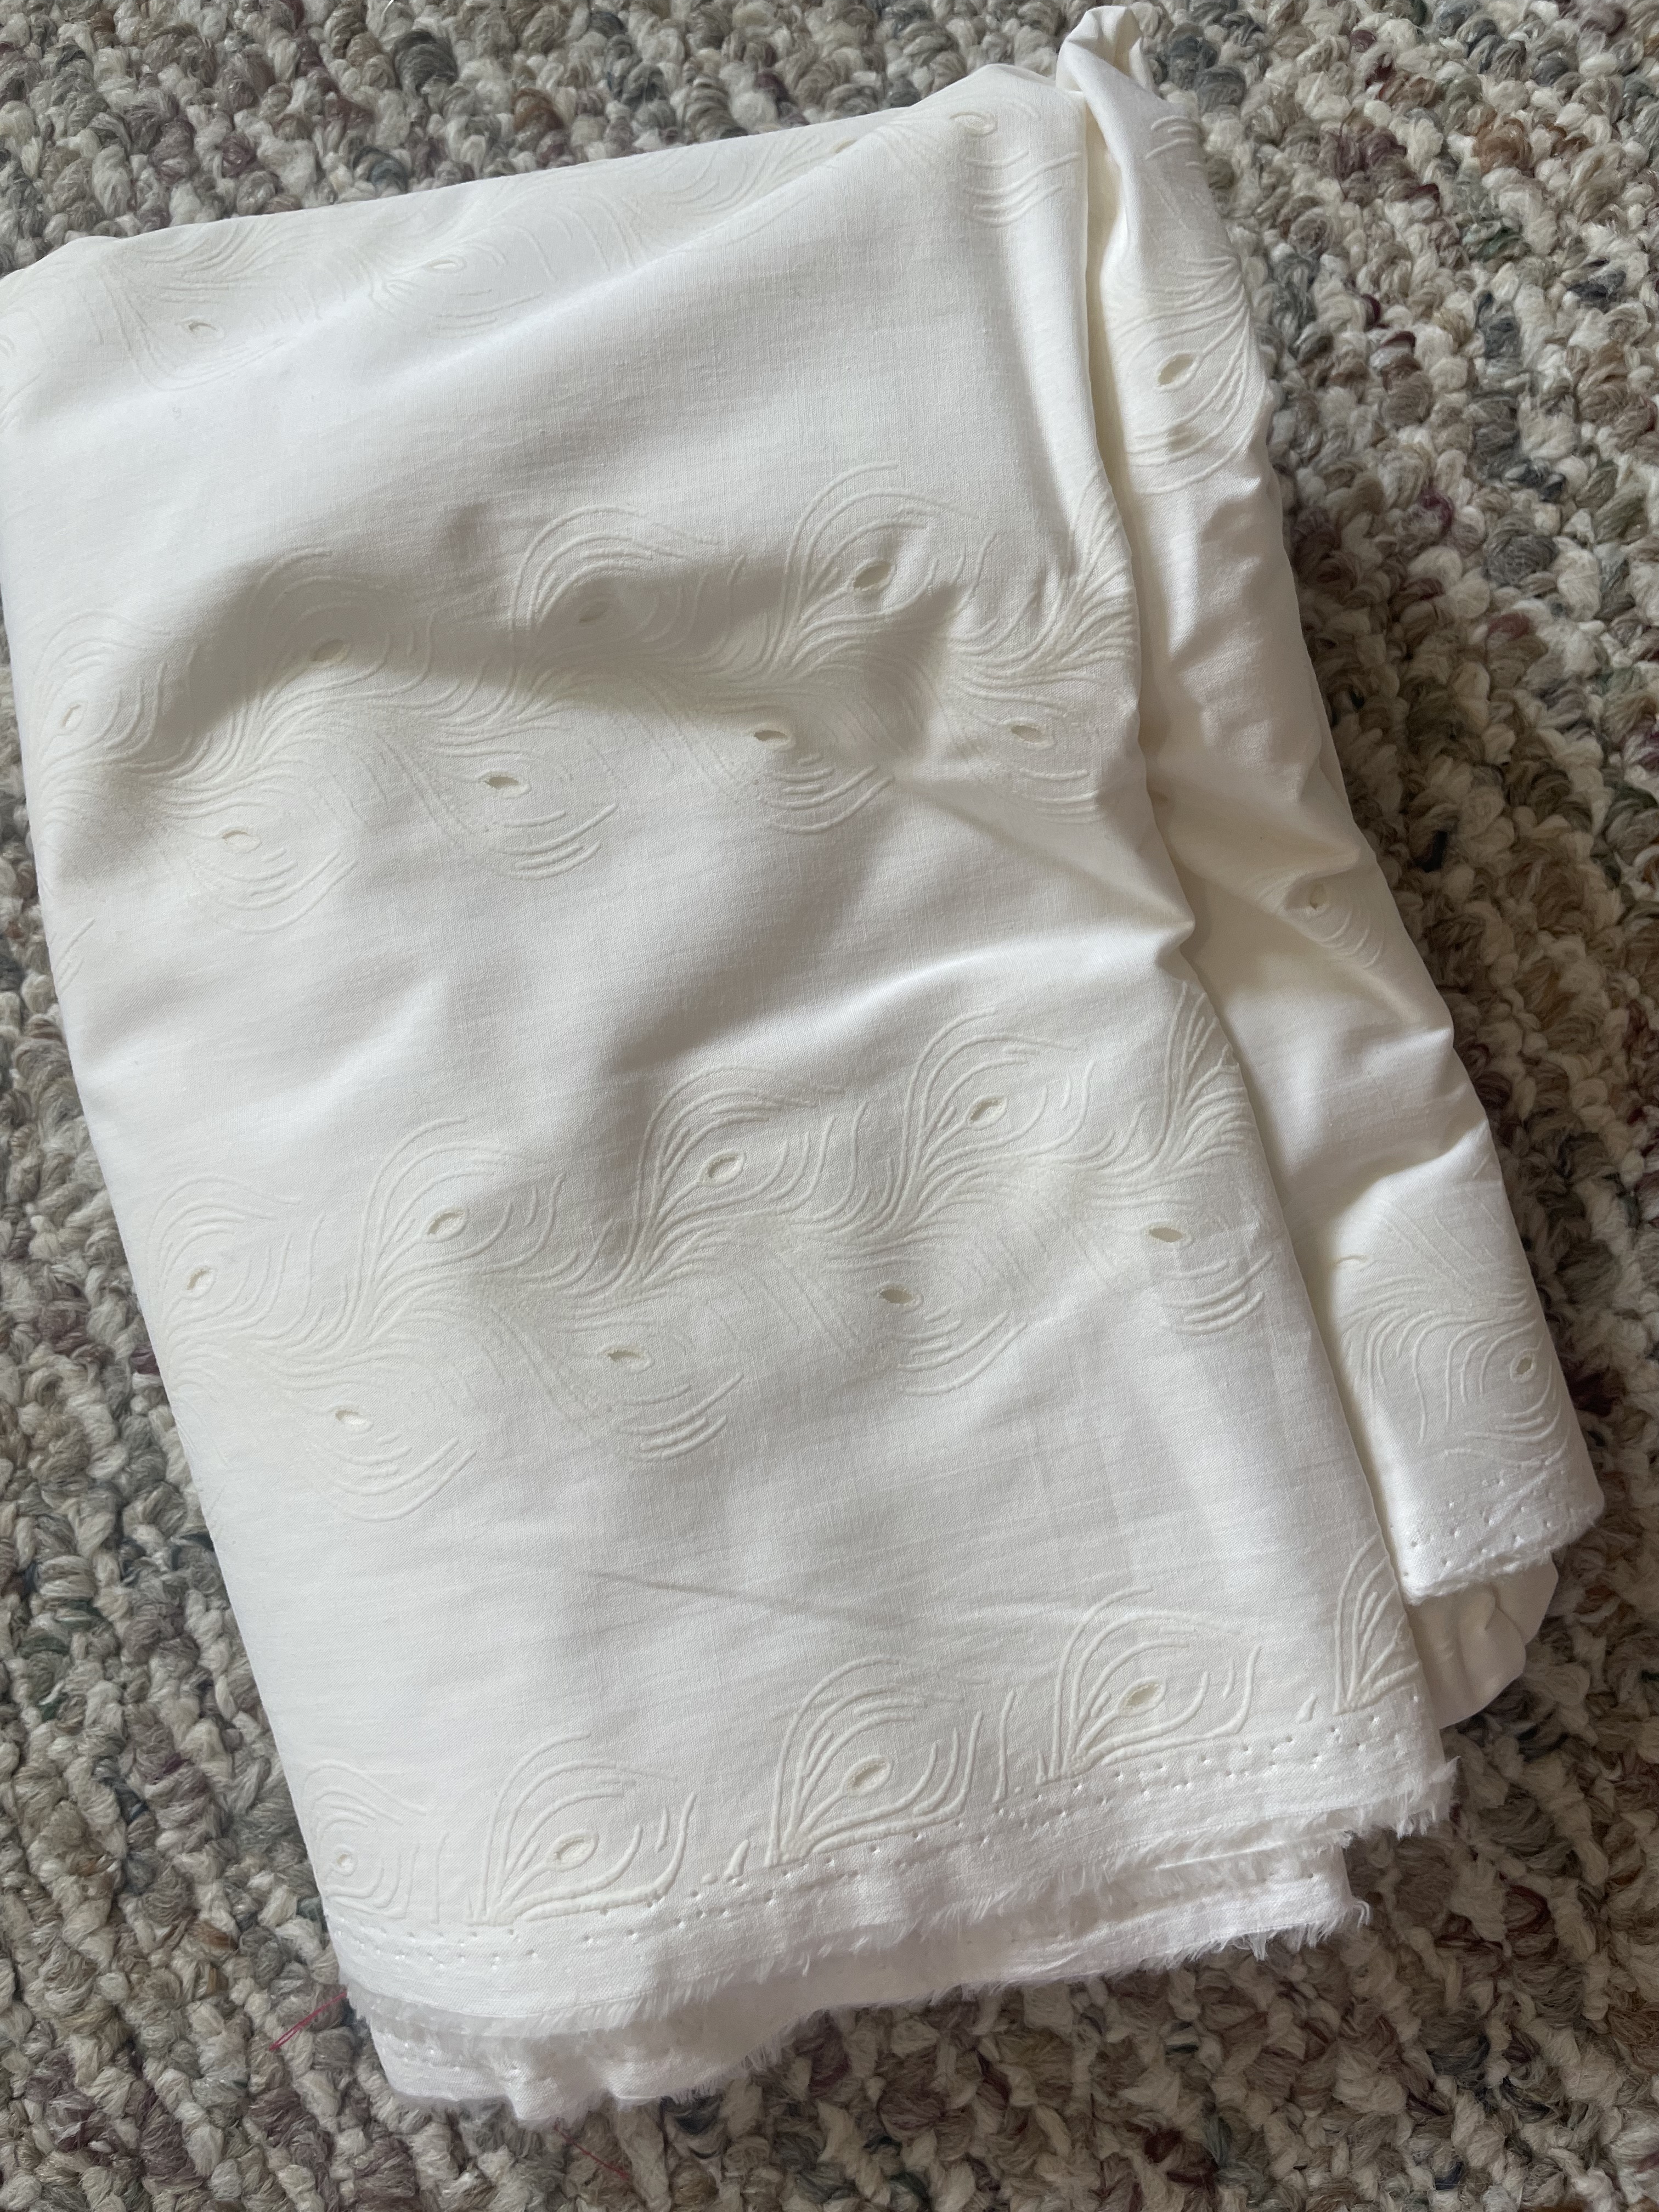
The first task was getting the right fabric. I thought maybe I’d be able to take a trip to NYC, since I wanted to actually meet the fabric in person and not just order online. Unfortunately fabric stores in New England are few and far between. I wasn’t able to get away, but luckily there is a local fabric business that is an online shop but sometimes will accommodate visitors if you make an appointment. This is Gorgeous Fabrics in Billerica, MA and it’s more than just a fabulous name. I wasn’t even sure I wanted something white, I was maybe thinking of pale yellow for the dress, but I ended up seeing something really unique that I loved. It was a cotton eyelet, but the pattern on it was different from anything I’ve seen and was told it was sort of a “peacock” print. It was an Oscar de la Renta fabric and I saw the potential right away.

I was able to pick out the perfect fabric for the lining, which I had to admit was very breathable in the warm weather. The only thing left was to figure out what to do about the bow in the back – the cotton was not flowy enough to create the right shape. The owner showed me some sheer organza that could work beautifully, with just a narrow hem.

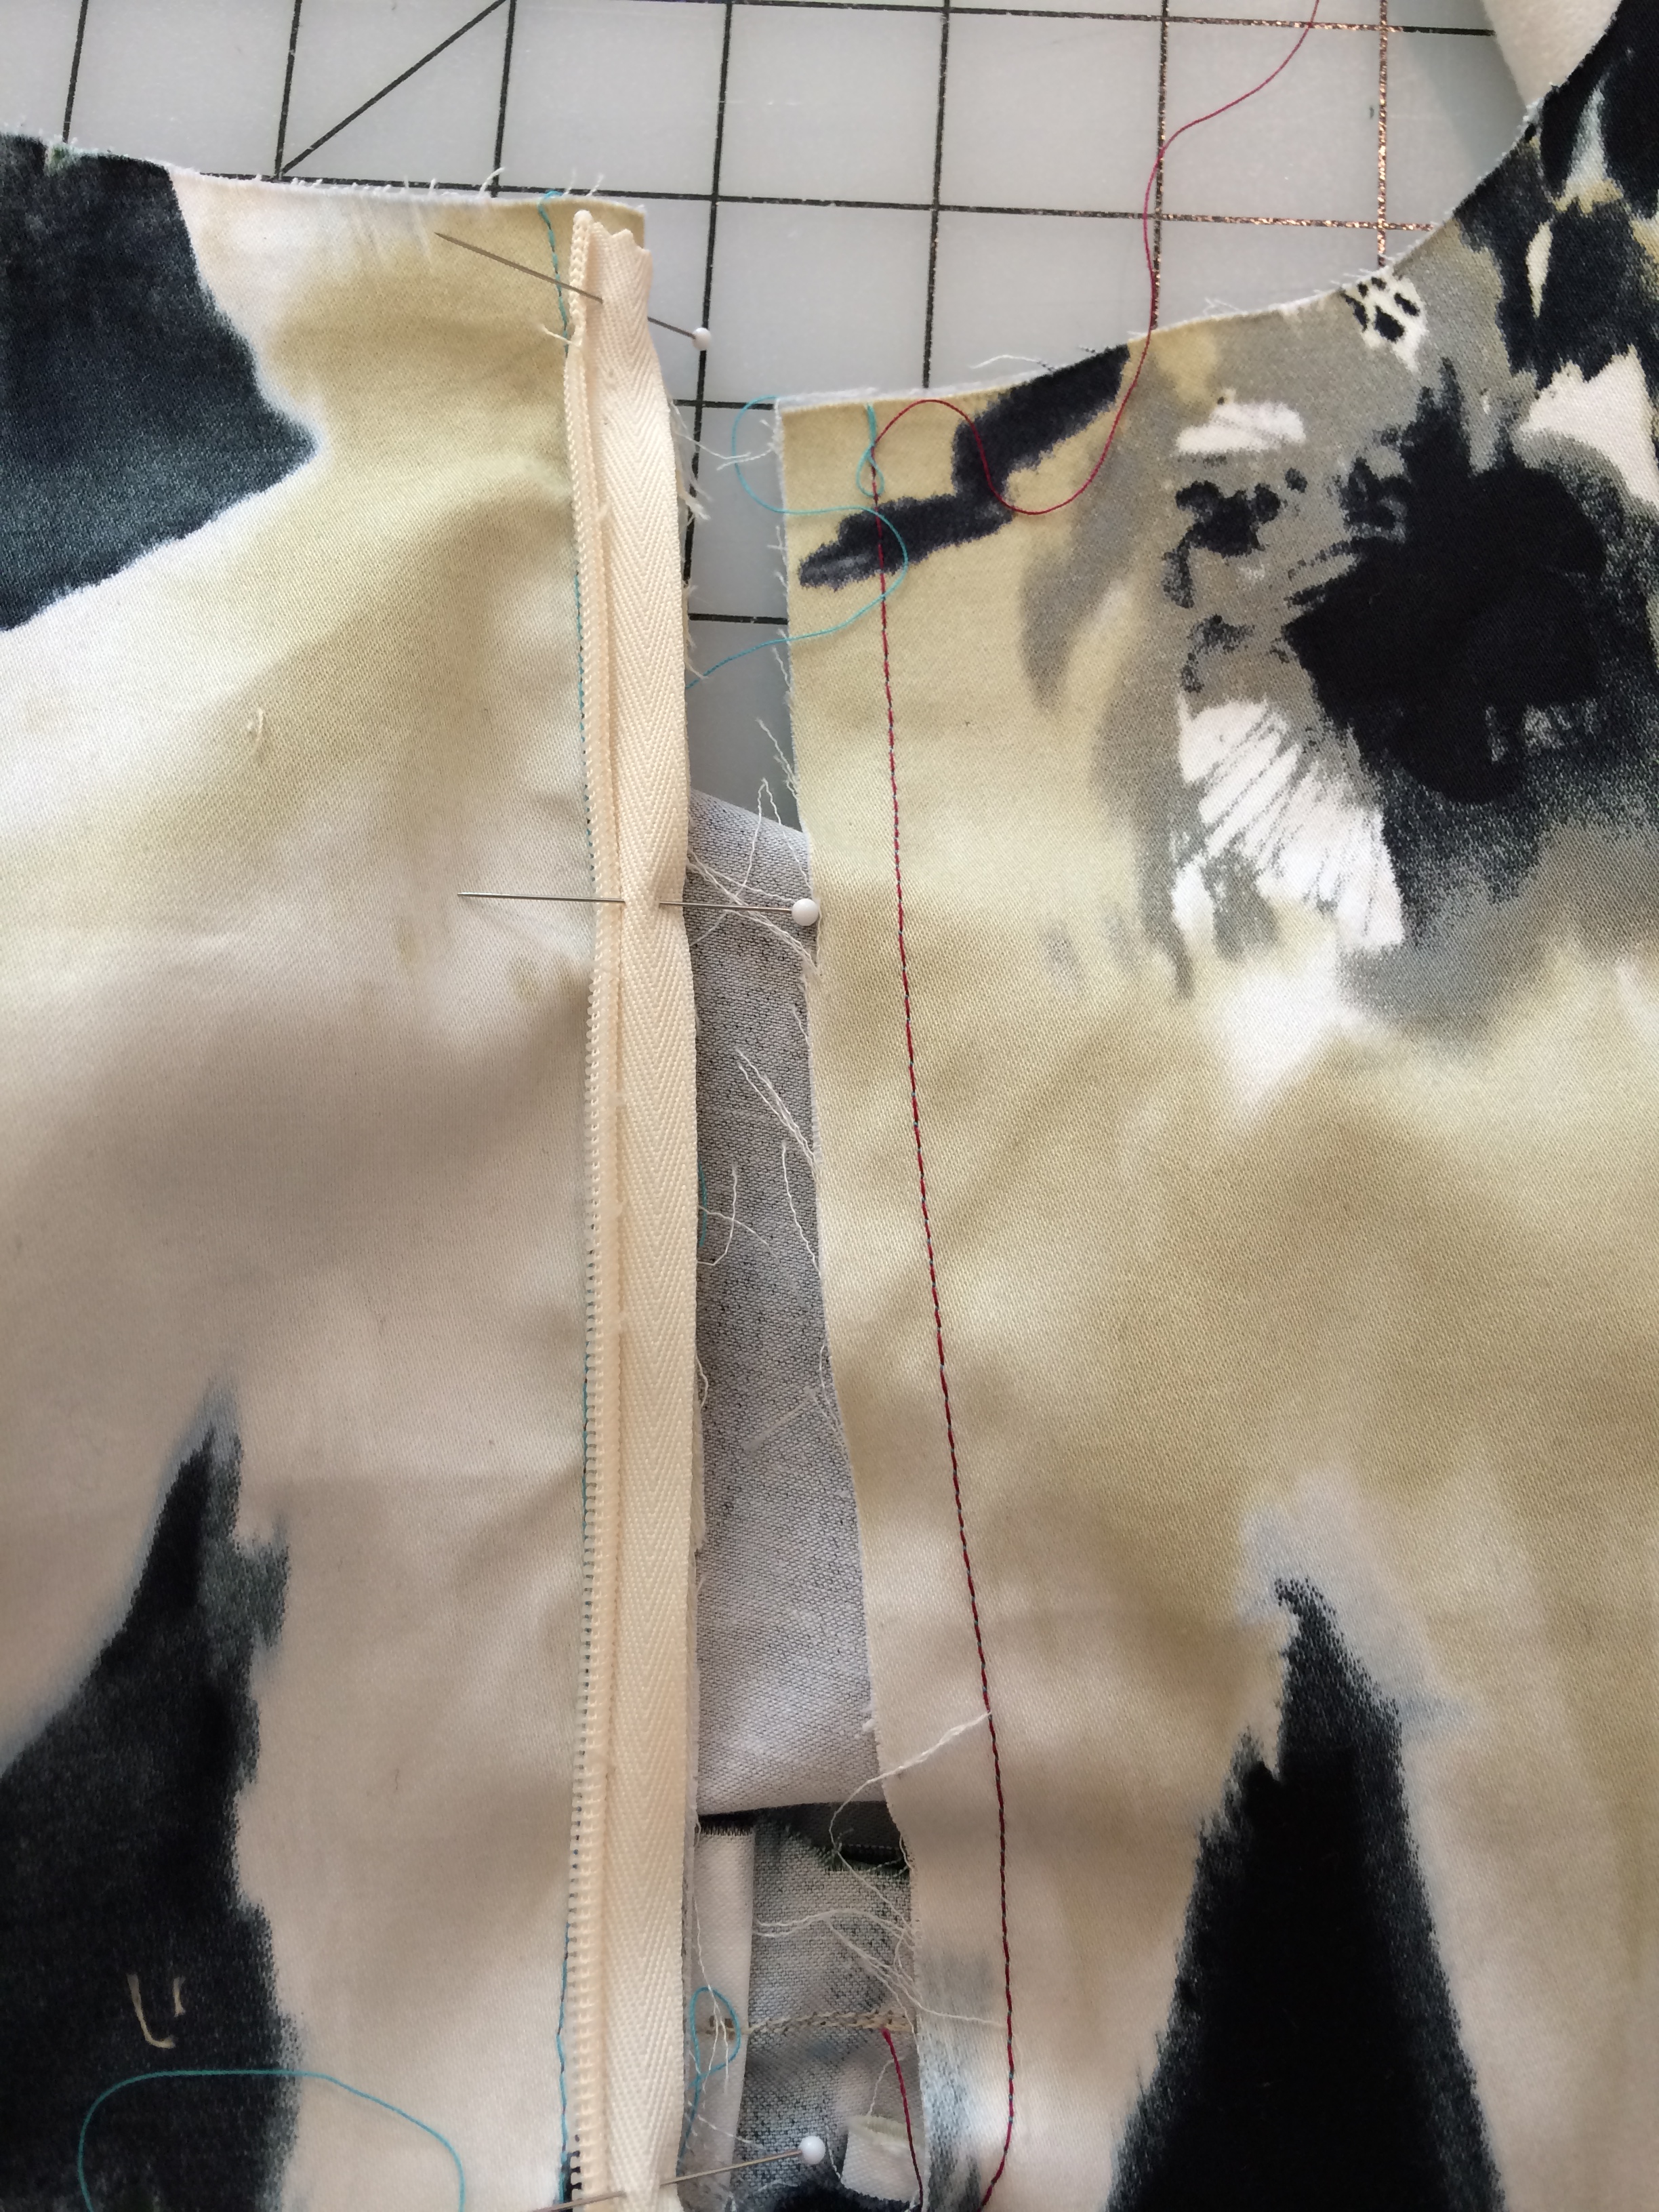
Because I wanted to be as sure as I could be, I of course made a muslin. This helped me determine the best fit, which was lucky, because it made me realize we would have to adjust the top to be a bit smaller and expand the hip section out a bit. The seam allowances were generous so I had a bit to play with, but we did measure out a half inch to make sure it wouldn’t be too snug around my lower half.

My wedding dress, in lovely muslin fabric

I also noticed how low cut the top was. A bra was pretty much out of the question, so I decided on sew-in cups. Another thing I’d have to purchase.

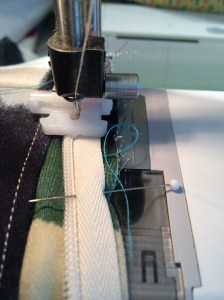
Working with the organza made me a bit nervous as it was so sheer. I got some good advice from the fabric store: 1) Do not pre-wash it as it will lose it’s stiffness which will make working with it impossible and 2) Hem it using Ban-Rol waistband interfacing.

I had never heard of such a product, but I guess it’s something that is used in men’s pants waistbands. Sewists have discovered it can make a pretty nice narrow hem on thin fabrics like chiffon or organza. I just needed to review a few YouTube videos and was off and running. You basically need to remove a few strands until you get the hem size you want, then sew it to the edge, roll the hem and sew it again. Then the whole thing can just be torn out and suddenly you have a pretty straight narrow hem.

Now that I had the bow section ready, I could put together the final dress. Cutting into this beautiful fabric gave me anxiety, but my mom was there to make sure I did everything correctly.

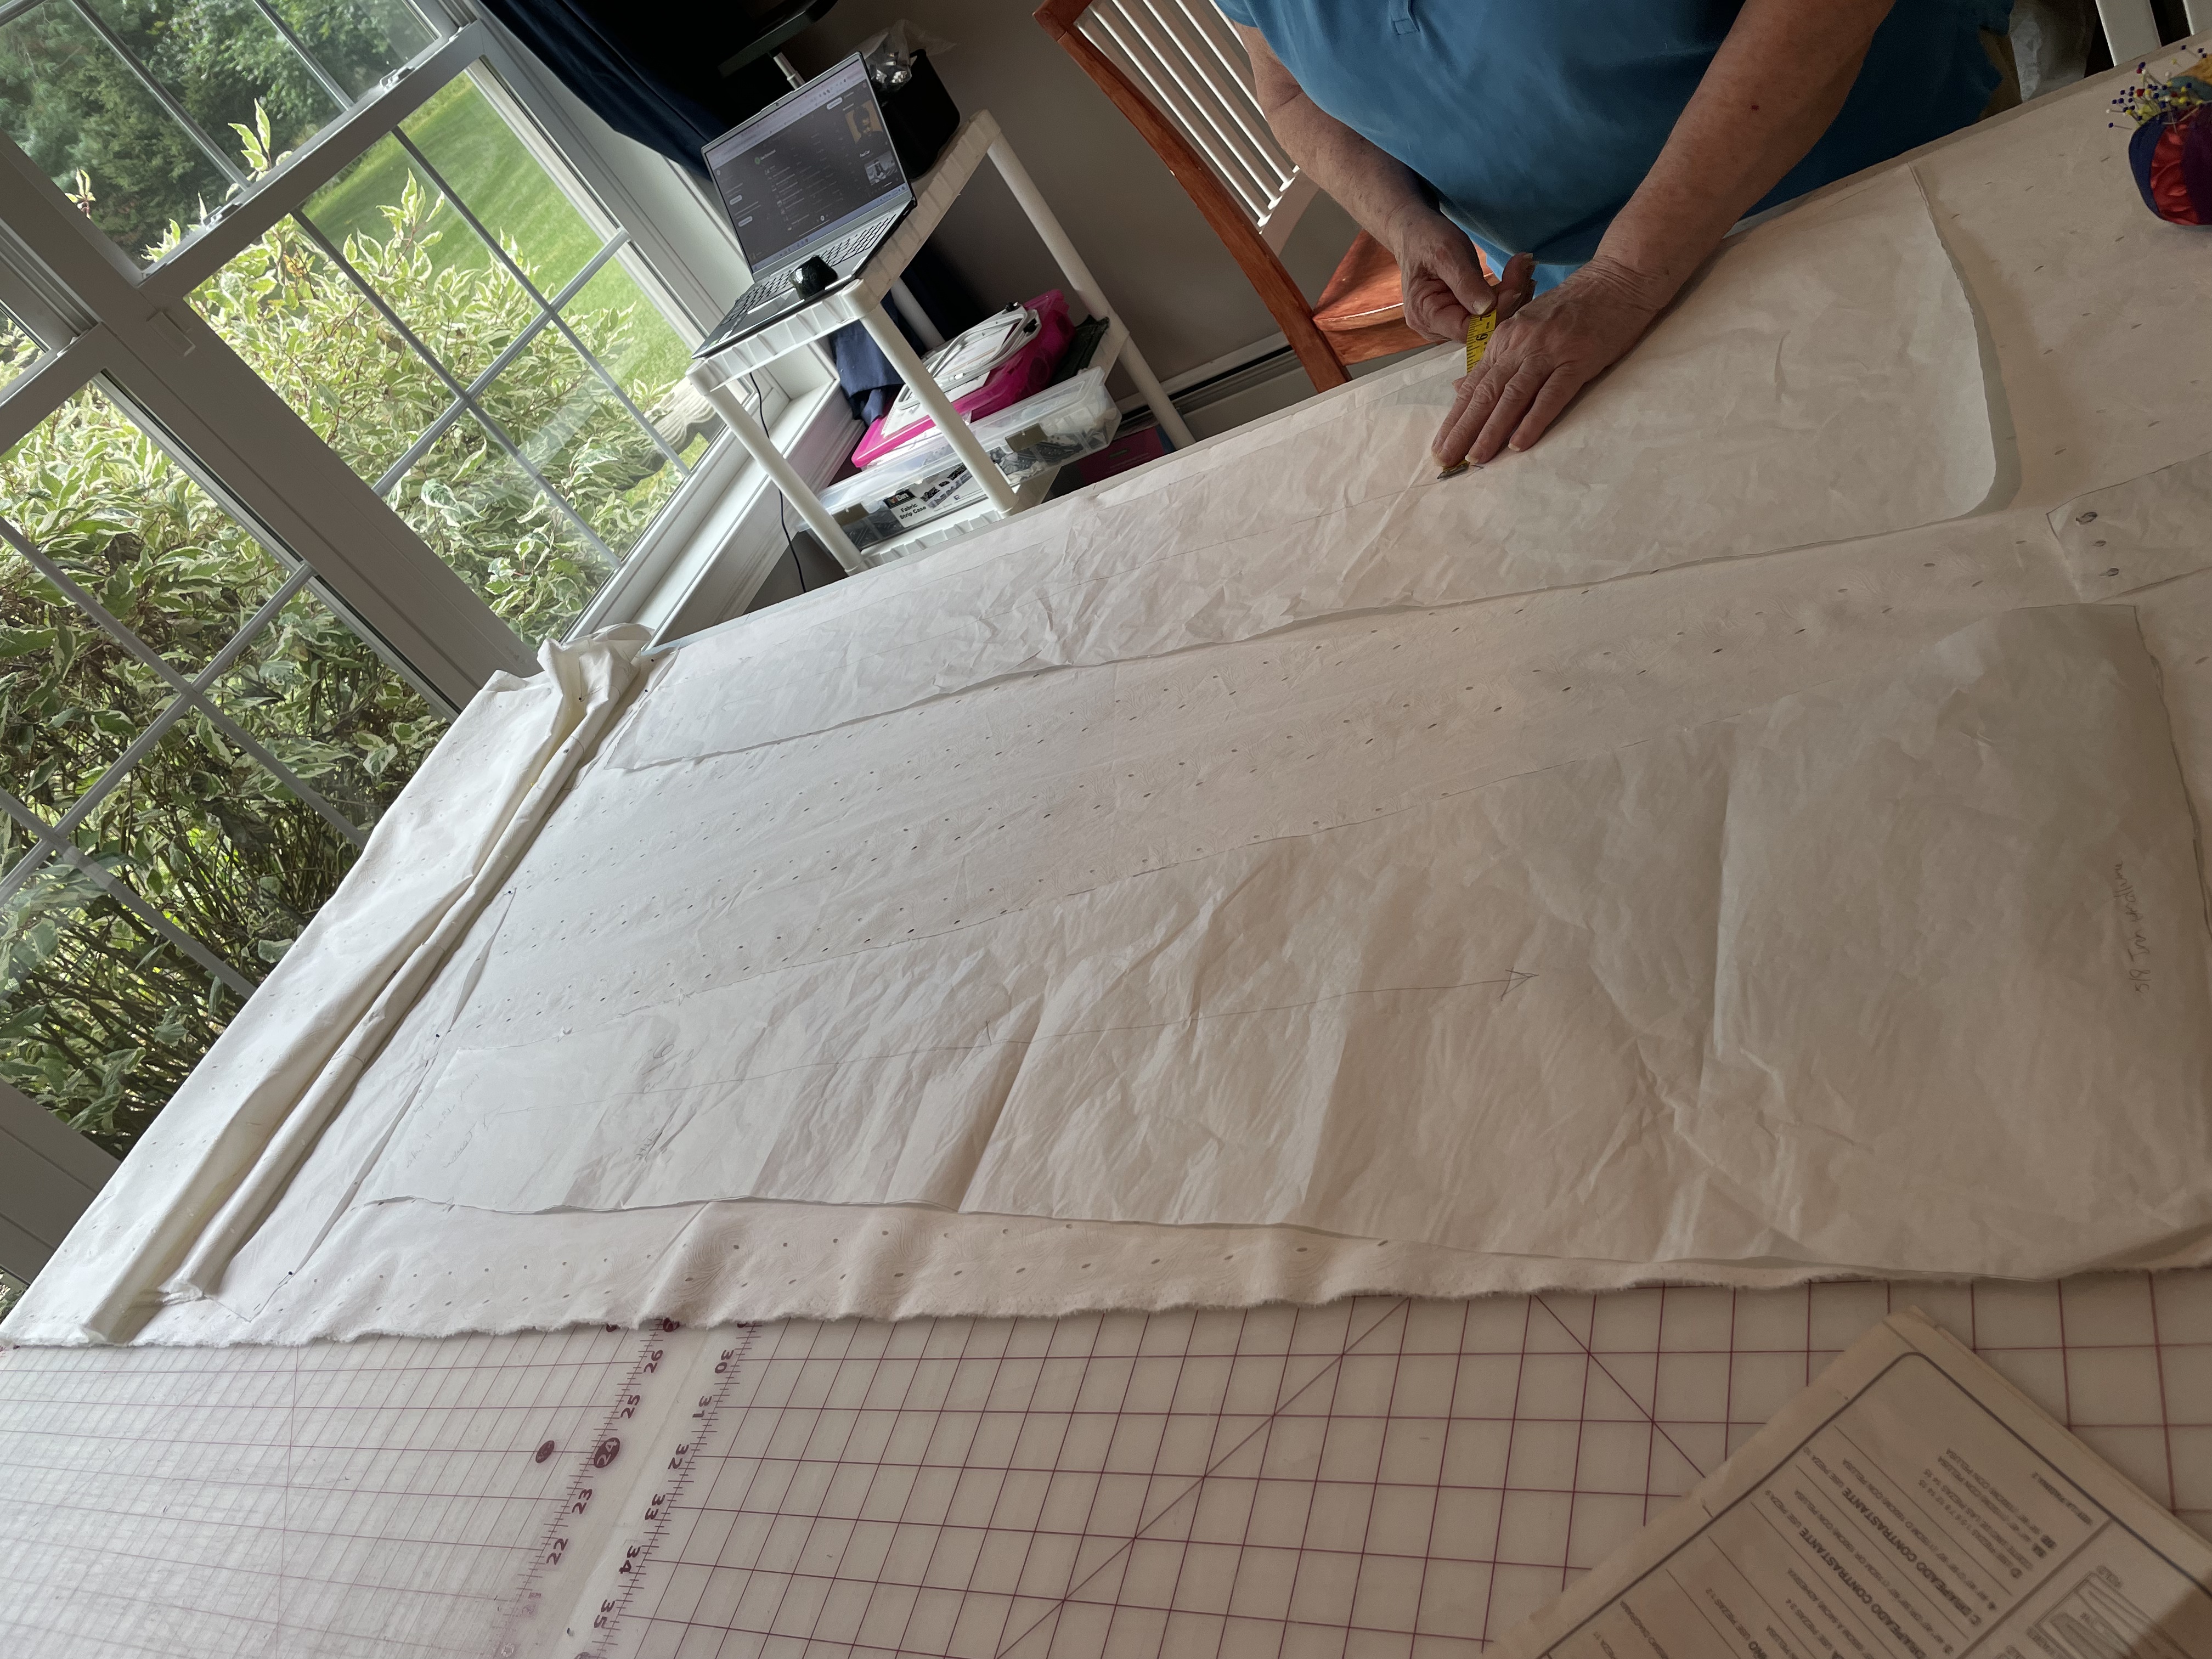
The issue I have with dress patterns from New Look is the directions are not always very clear. It took a few tries to figure out the bodice correctly, but luckily all this was worked out with the muslin. I think what threw me off was this was the first dress I’ve made that didn’t have a completely sewn together bodice. In this case, the bodice was in two pieces, the left and right. Each side would be sewn to the skirt piece separately.

I added no real embellishments, as I said I wanted a pretty simple dress. I did find a hook and eye that had a small rhinestone, which you could just barely see if you were staring at the back. The bow with the organza came out great, however we did have to tack it more at the back than the pattern intended, in order for it to lay flat when tied together.

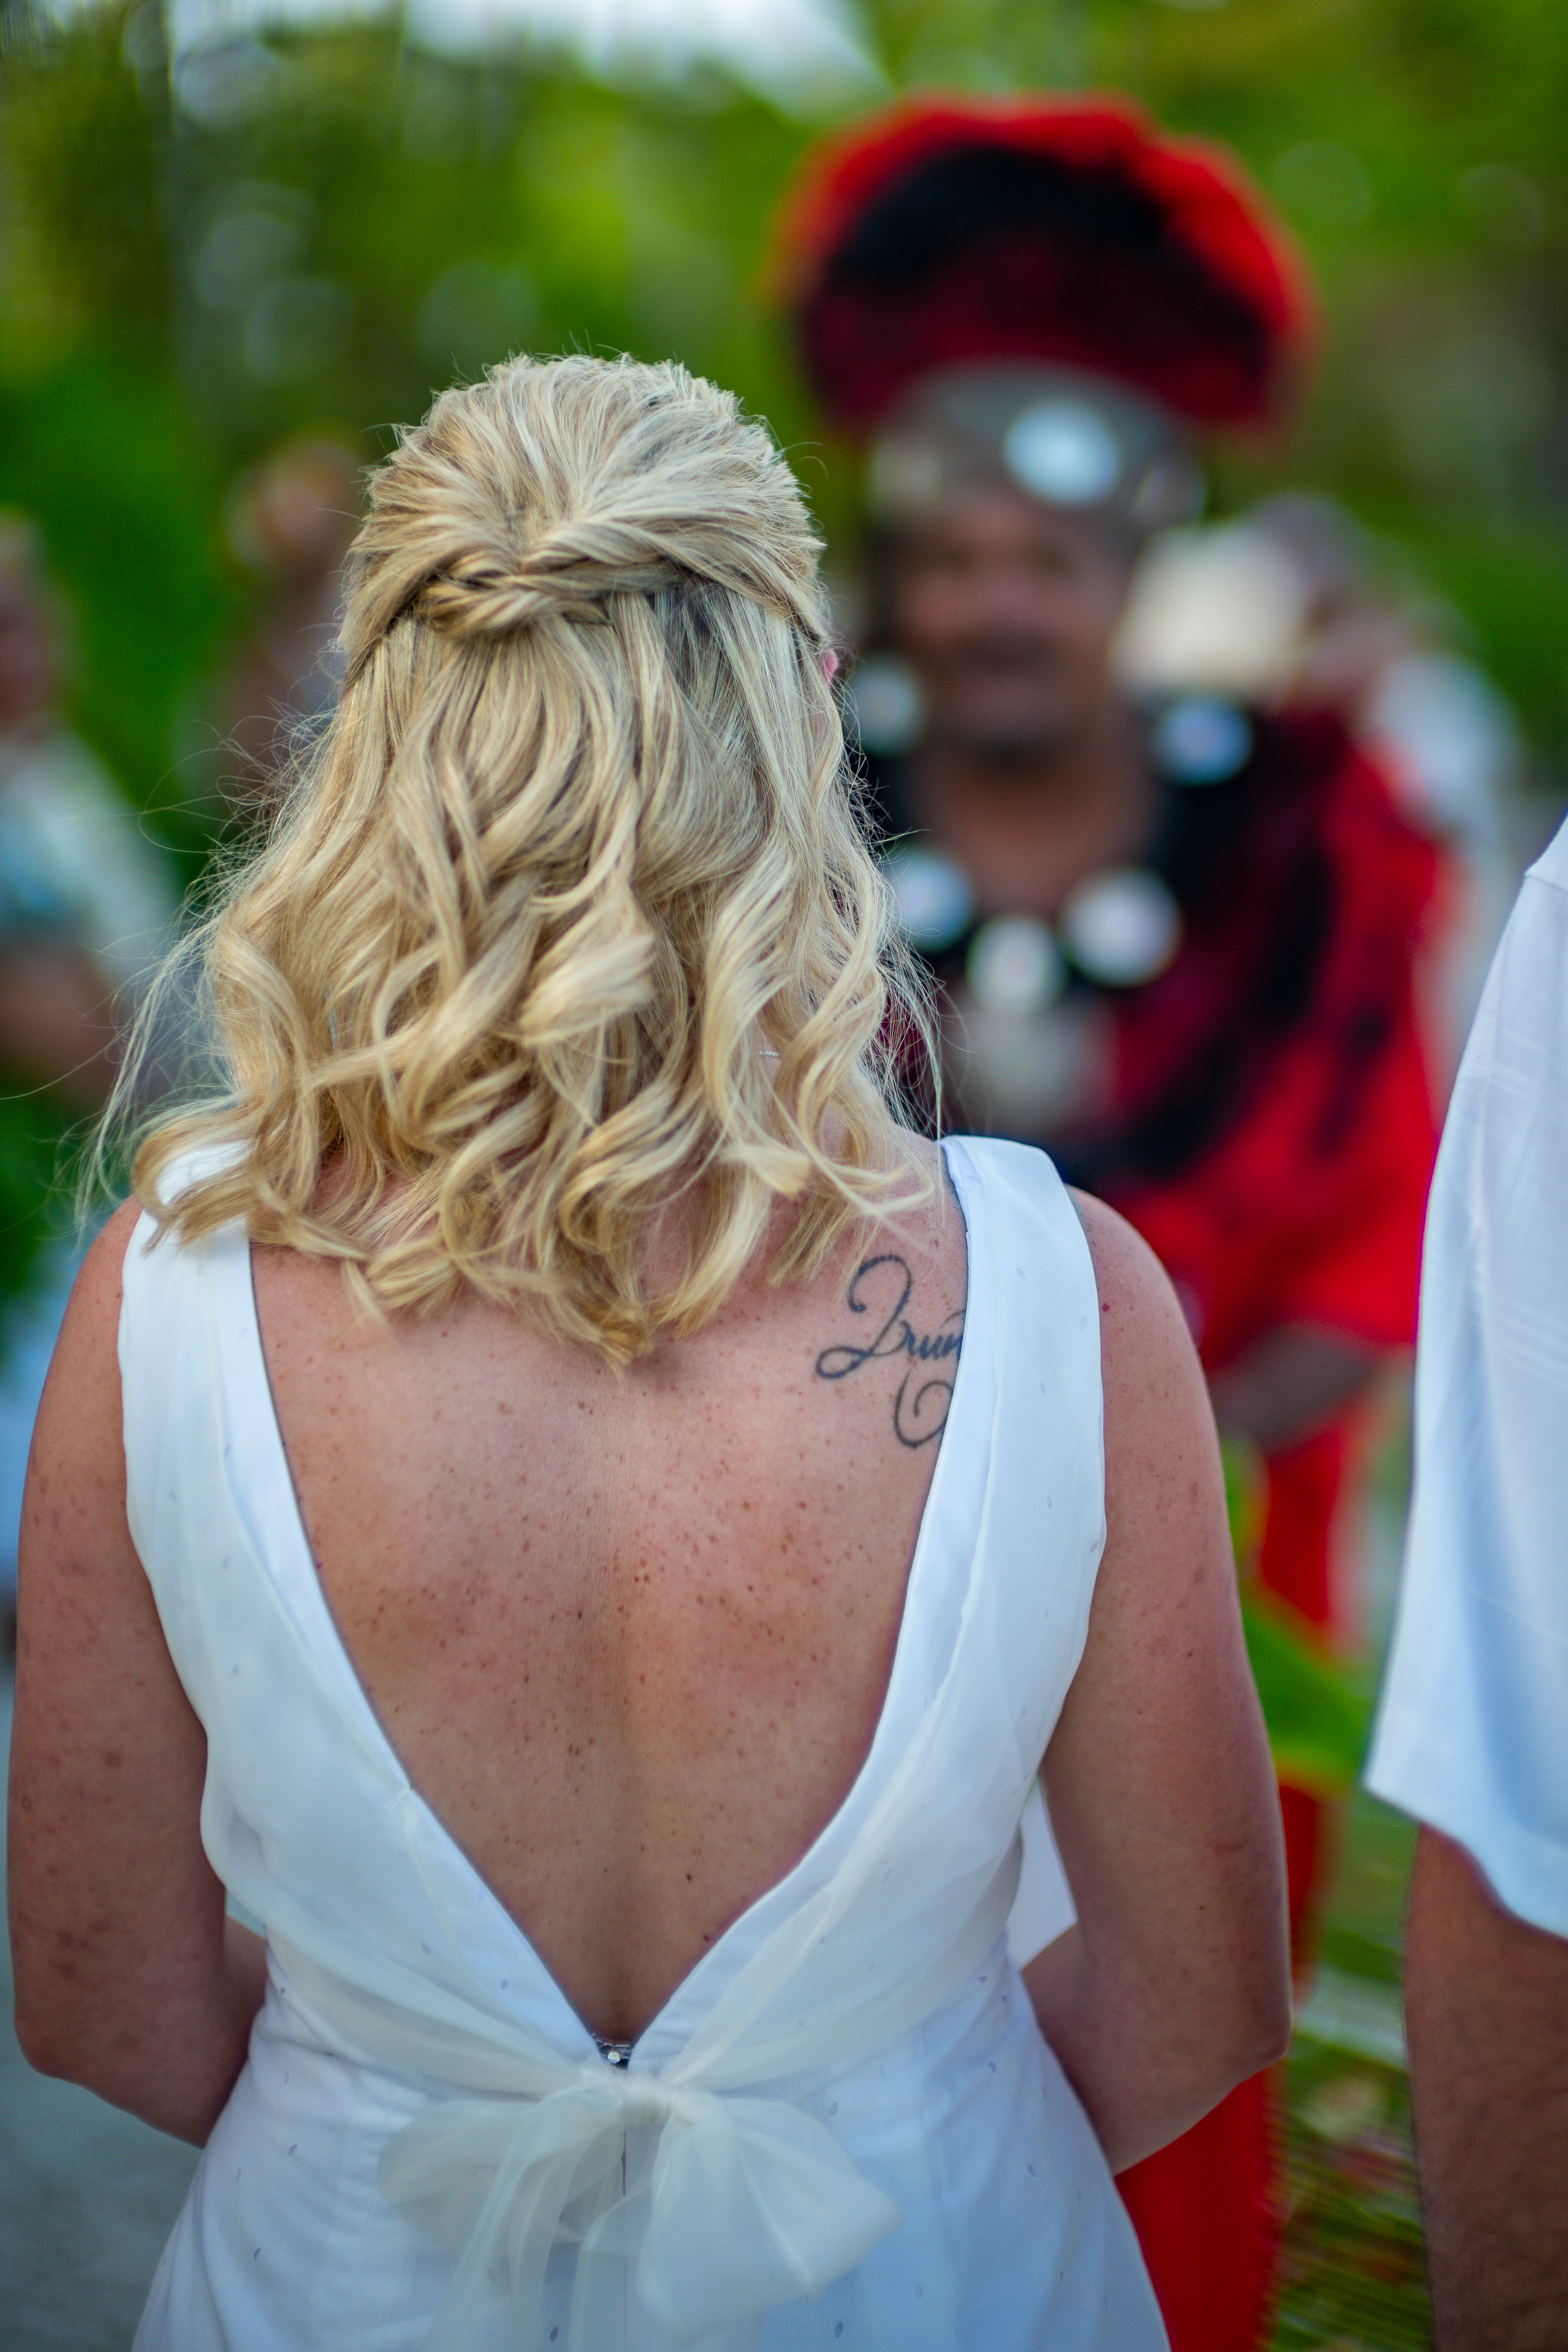
It may not have been the wedding dress of the year, but I am extremely proud of my accomplishment. I never in a million years thought that I could make a wedding dress that I would want to show off in photos. I couldn’t be happier with the results.

The wedding itself was perfect. The Four Seasons in Bora Bora really know how to make a day like this special and our wonderful photographer and videographer we hired through the hotel captured the day perfectly, as seen below. Although part of me missed having my family around, it was nice to just be able to focus on each other, as we started our journey together as husband and wife.

This coming year, I hope to share more of my sewing adventures, as well as my other adventures. They may not all be as exciting as a destination wedding in French Polynesia, but joy comes in all forms.

The Dress-for-Wedding Challenge: Epilogue

Pattern: Vogue Patterns American Designer, Kay Unger New York #V1353….continued from part 3part 2 and part 1

I thought it might be nice, since half my blog is about this one dress, to post a picture of the final dress in action.  Here is the dress I wore to my friend’s wedding over the July 4th holiday:

IMG_2963
Me, having a conversation with a mystery person. I cropped her at her request.

A few days before the wedding, I added the thread belt loops and a fabulous gold belt from TJ Maxx ($9.99).

Belt loop


The wedding was wonderful – everyone had a great time.  I was so happy to see my friends take this next step in their relationship. I also couldn’t believe that I got a few compliments about my dress, from people I didn’t know and who didn’t know I made the dress.  It gave me a great ego boost – and I was ready to dance up a storm at the reception (not pictured).

Dress for WeddingOne final picture, then I swear I will never speak of this dress again!  Haha!  But seriously, I would use this pattern again, I especially liked how the bodice fit and I didn’t need to make too many adjustments on the skirt.  It would be interesting to see it made with a different print, so if anyone out there attempts this dress, let me know!

IMG_2962
Seriously who is that mystery person?? I know you all want to know!


The Dress-for-Wedding Challenge: Part 3

Pattern: Vogue Patterns American Designer, Kay Unger New York #V1353….continued from part 2 and part 1 Phew!  It’s finally done.  Actually, I do still need to buy a belt, but all the sewing is finished! Where we left off...okay I put the invisible zipper in.  For those who don’t know, this is what an invisble zipper looks like.  The teeth are not exposed on the outside, like a regular zipper, so the material is sewed around the front of the zipper tape. Invisible zipper

Invisible zipper foot
Plastic invisible zipper foot – a great alternative to buying a whole new foot

It really wasn’t that complicated, but there were a few minor beginner hiccups that I will share.  I watched this video, which described the whole process perfectly.  I didn’t have a proper invisible zipper foot, so I just used the cheap plastic foot pieces you get at the fabric store and it worked just fine.  Pinning the zipperI also wasn’t going to take any chances screwing this one up, so I made a bright colored basting stitch where the zipper was going to go, and pinned one side as the video instructed me.  After I sewed the first side, it seemed right, but I had trouble zipping it up.  It seemed twisted.  Thinking I did the whole thing wrong, I un-did all the stitches and tried to figure out what the issue was.  I couldn’t see what I was doing wrong, so I attempted stitching it again.  It seemed right, until I tried zipping it up for the second time.  I finally figured it out – the bottom of the zipper had just flipped to the inside, so it only looked like I pinned it wrong.  Ooops!  Oh well, I know for next time. After sewing both sides, the zipper flipped in with the material and indeed became invisible within the back seam.  But all of a sudden I couldn’t zip the whole thing up to the top.  This puzzled me for a bit, but after some examination found that I had just sewed one section too close to the teeth and the zipper was getting stuck.  Minor fix – all set! Invisible zipper finished I think it just needs a press so that the material is a little flatter around the zipper, but otherwise you can barely see it.  Major learning: it is extremely important to sew as straight and close to the teeth as possible.  This is where that plastic foot comes in handy since it actually has a groove that allows the foot to glide easily over the zipper teeth, keeping everything straight and tidy. This dress has a full lining in it, which attached at the neckline.  The pattern also had me cut out a hem facing, which was to be sewn to the bottom of the dress.  As I completed this step, Continue reading “The Dress-for-Wedding Challenge: Part 3”

The Dress-for-Wedding Challenge: Part 2

Pattern: Vogue Patterns American Designer, Kay Unger New York #V1353….continued from part 1

There is nothing like a slightly rainy holiday weekend to give you the motivation to sew!  Things have been so busy over the last couple weeks with work, random obligations, and my actual graduation from business school that I hadn’t gotten a chance to work on my new dress.  I was grateful for the 3-day weekend to get started.

But I first want to mention that my oldie New Home machine is now in semi-retirement.  I’m sad that I won’t be using it as I’ve gotten quite attached to it, quirks and all. It will be a good thing in the end because I have far less bobbin issues with my mom’s old (my new) Husqvarna machine.

New Home sewing machine

Okay back to the dress.  The pattern seems very straight forward, instead of cutting the front bodice on the fold it had me do a little flip-around thingy instead since there were really no other pieces to cut on the fold.

Bodice patternI was able to get it pretty even.

The front bodice has darts and pleats.  I hadn’t done darts in forever, so I had to try to remember how they worked.  I had to go online for a refresher video to remind me how to sew the triangles in and press them down.  Ah yes, it was all coming back to me.  They were so easy, I may start putting darts in everything now!

The pleats along the neckline were something I hadn’t done before so I watched a few online videos (like this one) and figured it out.  I had some trouble with this research because there were a lot of references to box pleats and knife pleats and I had no idea what type this was.  I still don’t actually know, but the video I found showed me a picture of a pattern that looked like mine.  Works for me!  The pattern markings Continue reading “The Dress-for-Wedding Challenge: Part 2”

The Dress-for-Wedding Challenge: Part 1

Kay Under Pattern V1353Pattern: Vogue Patterns American Designer, Kay Unger New York #V1353

I almost put the title as The Wedding Dress Challenge, but changed it because I didn’t want people to think I was getting married, or worse yet attempting to make a wedding dress!  Eeeps!  A friend of mine is getting married on 4th of July weekend and I thought it would fun to wear something of my own creation.  I may be eating my words later.  But I feel like I have enough time to complete this task.  Plus I’ve had this pattern that I’ve been dying to try and some lovely material I bought many months ago that is just itching to be used.

Dress for wedding material
I think this is cotton, and it also has a little bit of stretch to it

I know, it looks pretty complicated.  But the rating says “easy” so I have some confidence in this project.

I had hoped to do some cutting on this today, but my day just got in the way.   So check back to see my progress as I attempt my first special occasion dress.

Something Old: This pattern has been sitting in my collection for about 9 months, which is not too old, but older than other patterns I have.

Something New: It calls for an invisible zipper!  I’ve never worked with one before and it looks like I need to use a special foot for it.

Something Borrowed: Technically I am borrowing my mom’s old sewing machine (only 10 years old), since she just bought a brand new one.

Something Blue:  I think there is some navy blue in there somewhere.

I also need to get about 2 yards of lining material, Continue reading “The Dress-for-Wedding Challenge: Part 1”