Pattern: Simplicity 4127
In case you were wondering, that vague post title refers to the fact that I made a muslin, which is something I pretty much never do. I just don’t have much patience when tackling new projects. But, I have also noticed that being a newbie, I tend to make a lot of mistakes. And I also notice that the second time I make something, I make less mistakes, soooo….yeah you see where this is going.
Making a muslin refers to making a “trial” garment out of some inexpensive material. Traditionally these were made with muslin, hence the name, which is a really plain cotton fabric. But now the term “making a muslin” is used for any fabric that may be used. This is my understand at least, from reading many sewing blogs. Feel free to correct me if I am wrong.
I bought a wonderful white material labeled “as seen in J Crew” at the Fabric Corner in Arlington, MA. I bought it because it reminded me of this cute summer top I used to have when I was much younger, that showed off my midriff. I’m not at an age where I can show that much skin, but I did want another cute summer top, so I splurged on it (it was pretty expensive) and then bought this pattern:

My mom gave me some brown-ish printed cotton that was leftover from a quilting project. So I got to work.
I decided t hat I did not want to make a lining, but as I was reading the directions, I realized a lining was actually necessary to make it properly. I didn’t really have enough material for a bodice lining, so I decided to just make a facing that would go fit around the top of the tank, making sure that I pressed and stitched it down.
 This seemed to work well. The pattern also called for making straps out of the fabric and then sewing ribbon on top, as a decoration. This was pretty easy.
I decided to also make an adjustment on the zipper. They wanted a normal zipper, but I thought an invisible zipper would be easier and a lot cleaner looking. They don’t make invisible zippers the size they requested (that I could find easily anyway), so I bought a longer one, cut it, and stitched it up at the bottom.

The bottom part of the top was pretty straight forward, just needed some gathers to fit it to the top.

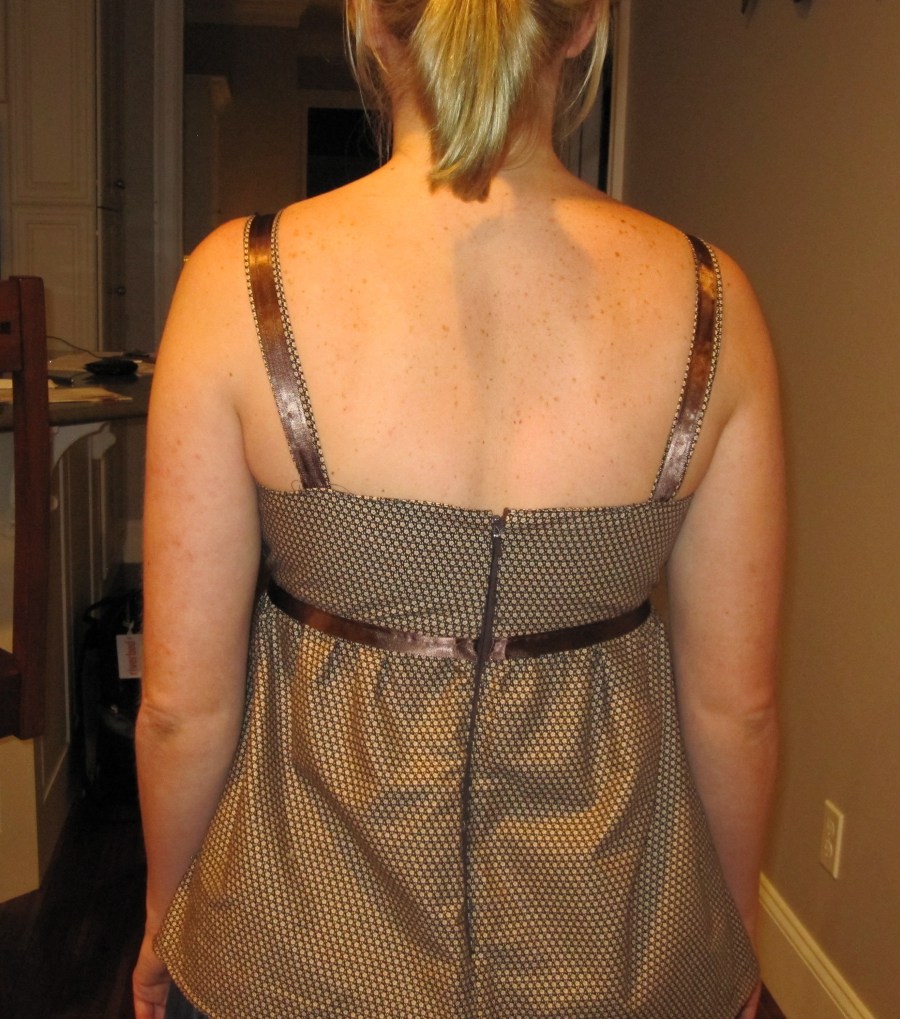
Now of course, I made some mistakes with this one. If you can see from the picture above, the straps are a bit off the front placement. I was trying to hard to match where they went on the pattern, but I should have just looked at the front to see where the obvious placement should be. Now I know. But the biggest mistake came when I realized the tank was going to be too long and I would need to trim it before I hemmed. I then proceeded to hem the bottom, but did not notice the two back sections did not line up.

Oops! How did I miss that one? Seriously. It wasn’t until I put in the zipper that I realized one side was clearly longer than the other. I had to cut the back towards the side seam, and then kind of fold up the hem on a slight diagonal on the side to get everything to line up. A small cheat. I made a note of how much I cut off, so that when I make my real top, I can shorten the pattern.

Okay not so bad. Just needed to tuck in some material by the bust, so the straps don’t look too uneven. Also add a pretty bow to the front.

And here is the back with my invisible zipper and minor adjustments:
 Hmm…just realized in the photo you can’t see how I fixed the bottom, but I assure you, it’s looks even now. My conclusion is, I’m really glad I made the muslin. I will still be able to wear this top, but my next top will be so much nicer now that I got all my beginner mistakes out of the way. I’m sure I will make some other mistakes, but hopefully they will be minor in comparison.
I can definitely see the value in testing out a pattern in this way. Now, will I do it every time? I should, right? I mean, I proved it was worth it….but on the other hand…the extra time. I think it will have to be a case by case basis. What do you think? How often do you test out a garment before making the real thing?

Pingback: Wait, is it After Labor Day? | Threading Lightly
I have got into the habit of making muslins for fitted bodices or for completely new to me patterns (i just started on a burdastyle pattern and had no idea how the sizing would work out) – I buy cotton duvet covers from charity shops for a few pounds and that provides lots of fabric for quick test versions! Your top looks great – its a bonus to have a test version that is wearable!
Louise
LikeLike
Oh case by case. If I’m scared to cut it out I make a muslin first! Sometimes it works – my intuition is right, sometimes not! Nice top!
LikeLike
Not every garment needs/deserves a muslin, but it’s worthwhile particularly when making something close-fitting. My biggest problem is remembering to go back to the pattern pieces and record the changes that I made in the muslin stage.
LikeLiked by 1 person
That’s good advice! Luckily this one fit fine enough – just need to shorten the pattern. And make sure I pay attention to where the straps go. Thanks for the comment!
LikeLiked by 1 person
I agree with the case by case basis. I rarely make a muslin but think it is a good idea for expensive fabric you’d hate to waste on a project gone wrong.
LikeLiked by 1 person
Definitely, like in this case. I’m really glad I did it so I didn’t screw up with that expensive fabric I bought. Thanks for the comment and hope your move went well!
LikeLike
Excellent job! You can also use your muslin as pattern pieces in the future. So if you LOVE the top, take it apart and use it as your pattern. I sometimes take apart old clothing that I love and use it as the pattern.
LikeLiked by 1 person
That’s good advice! I do have an old pair of pajama pants that I use as a pattern as well. I should do that more often.
LikeLike