Patterns:
- Sewaholic Pacific Leggings
- Closet Core Ginger Jeans


Few things seem more complicated to me than sewing up a decent pair of pants. I’ve attempted dress pants, casual pants and leggings but I’ve never really successfully made a pair of pants I’ve liked enough to wear all the time. The exception to this is of course pajama pants, but as soon as any complication is thrown into the process, the results are not great. The main issue that comes up is usually fit, as I tend to make things bigger than I need. In some cases I’ve actually lost weight during the process of making them, and they end up just not being quite right.
Project 1: Working out workout pants
I’m in the middle of a couple projects right now, forcing myself to get this pants thing right. The less complicated project of the two is a pair of exercise leggings. I’ve attempted this before which had okay results, but I never really wear any of the ones I’ve made. On my first attempt, I successfully added a back zippered pocket to a pair of Papercut Patterns Ooh La Leggings. It worked but it was never ideal, as the back panel was not well suited for it and my stuff tended to really float around back there. The main issue with these pants was actually the fabric, which didn’t really have much two-way stretch. It was a soft cotton-knit, but unlike what I usually wear when I run or work out. My 2nd version also had its issues with the fabric not being that opaque, so I was always a bit self-conscious wearing them.

I tried this again with a different pattern, Fehr Trade’s Duathlon pants, which were specifically designed for running and exercising. I really liked this pattern and it was honestly very easy to follow. I used actual spandex this time and they looked like real running pants. I put them on and…they were too loose. I got so scared these would be too small that I didn’t even think of the fact that they are supposed to be smaller than normal because they need to stretch onto your body. Then with all the running I was doing, I lost even more weight and these began to just hang on my body. I can still work out in them, but I don’t feel too comfortable wearing them running and I think baggy spandex just looks too silly.

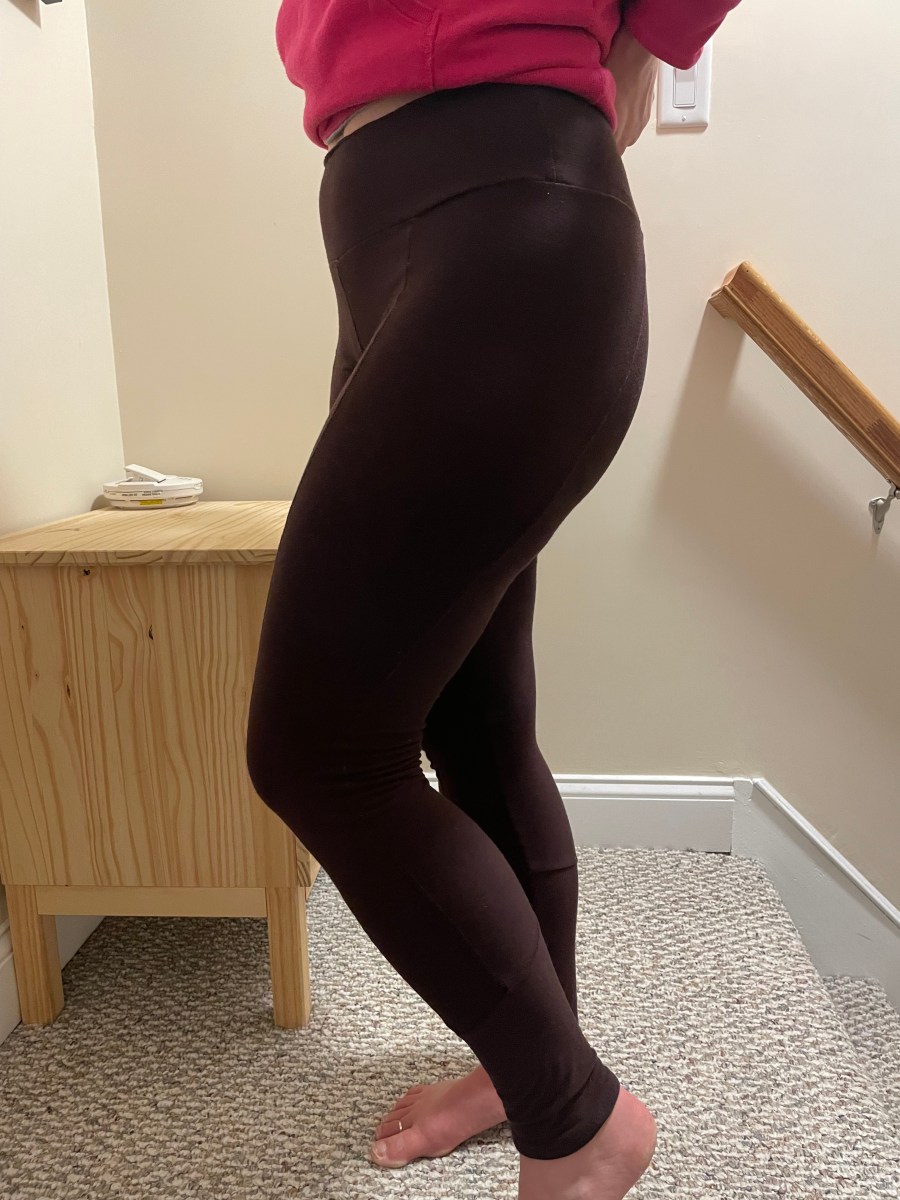
This time it will be different, I swear! The first part is picking a pattern that is the exact design of what I want. This time around I am making Sewaholic’s Pacific Leggings. I love this pattern company as they make patterns specifically for pear-shaped people (like me). This pattern had a version with the back zipper pocket that I’ve come to rely on when I am running. I wouldn’t have to figure out how to add one later. Perfect! And there were options for color blocking. Fun! And it has a gusset. Yes! Or…wait a minute, what?! Okay this was a new one on me which brought all that pants anxiety back. A test pair would be needed before I cut into that new yogawear fabric I bought, to make sure I know what I am doing.
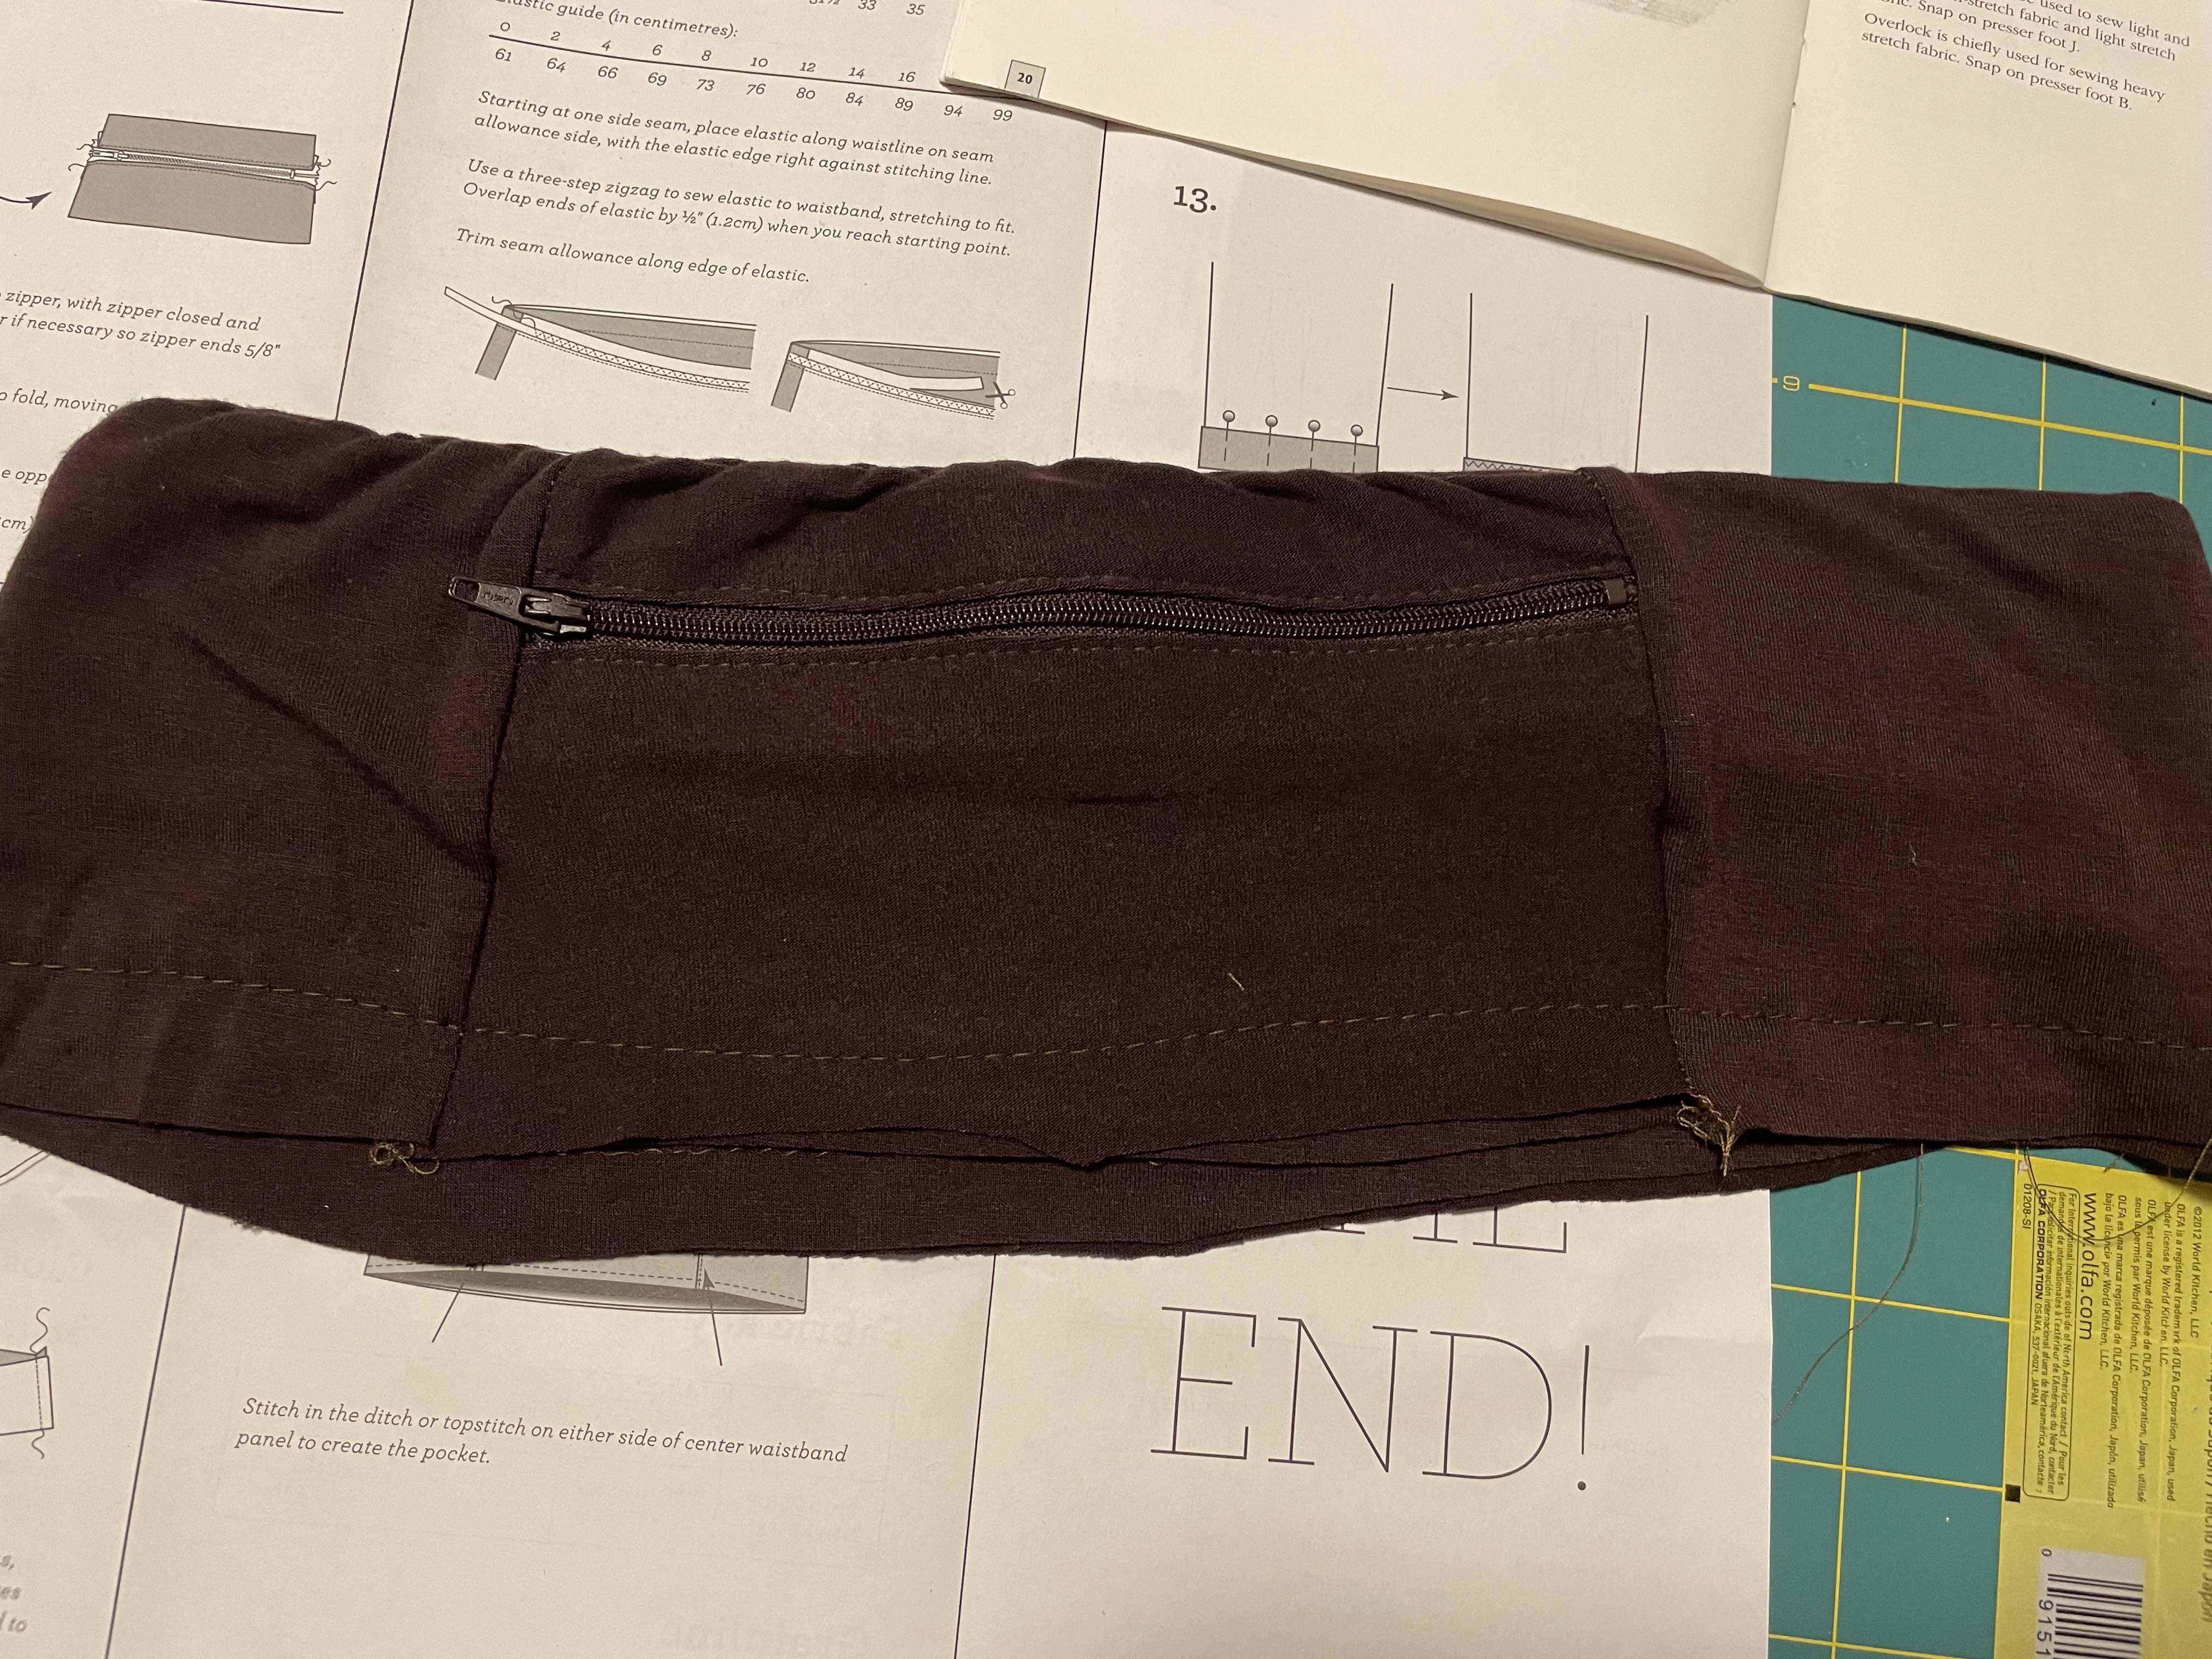
I found some brown knit that was leftover from a shirt I made and I had just enough. I have to say the zipper pocket was way easier than I anticipated and came out really good. I was using my serger for most of this, so I didn’t think to use a stretch stitch on the waistband where you have to sew around the edge before you install the elastic. Of course I popped some stitches when I tried this one, which is why there is this weird seam at the top – learnings for next time.
As you can imagine, the hardest part was the gusset. Fortunately this pattern company has wonderful sew along tutorials with photos on their website. However I was still confused on where I was supposed to clip the inseams. I also wasn’t sure how to finish these seams, since you can’t use a serger on these seams. After a moderate attempt, I had a gusset and a pair of leggings that actually fit very nicely. The gusset however seems to sag a bit and create that dreaded “camel-toe” effect, which I know will bring all that self-consciousness back when wearing these.

I need another go at this, so I cut up some spandex from my stash. This time, I am doing a little color blocking with some bright fluorescent color on the sides. I may even do some topstitching on this one – we’ll see how it goes.

The legs sewed up fast, as with the brown pair. I’m now at the gusset stage, but I’m going to take my time to make sure I get this right. Stay tuned for part 2 on how this all turns out.


Project 2: Denim Boogaloo
The second project I am working on is a pair of blue jeans. After a few attempts at making corduroy pants using jeans patterns, I’m finally going to work with denim. It’s been a tough process finding a good pattern. Most of the jeans patterns I like require fabric with a 2% stretch. The corduroy I was using had no stretch so my pattern choices were limited, and they weren’t the most stylish options.
The first pattern I tried were a total disaster with the fly being crooked and the straight waistband basically made them impossible to fit. I tried another pattern, which was better with a curved waistband and clear instructions on how to create the zipper fly.
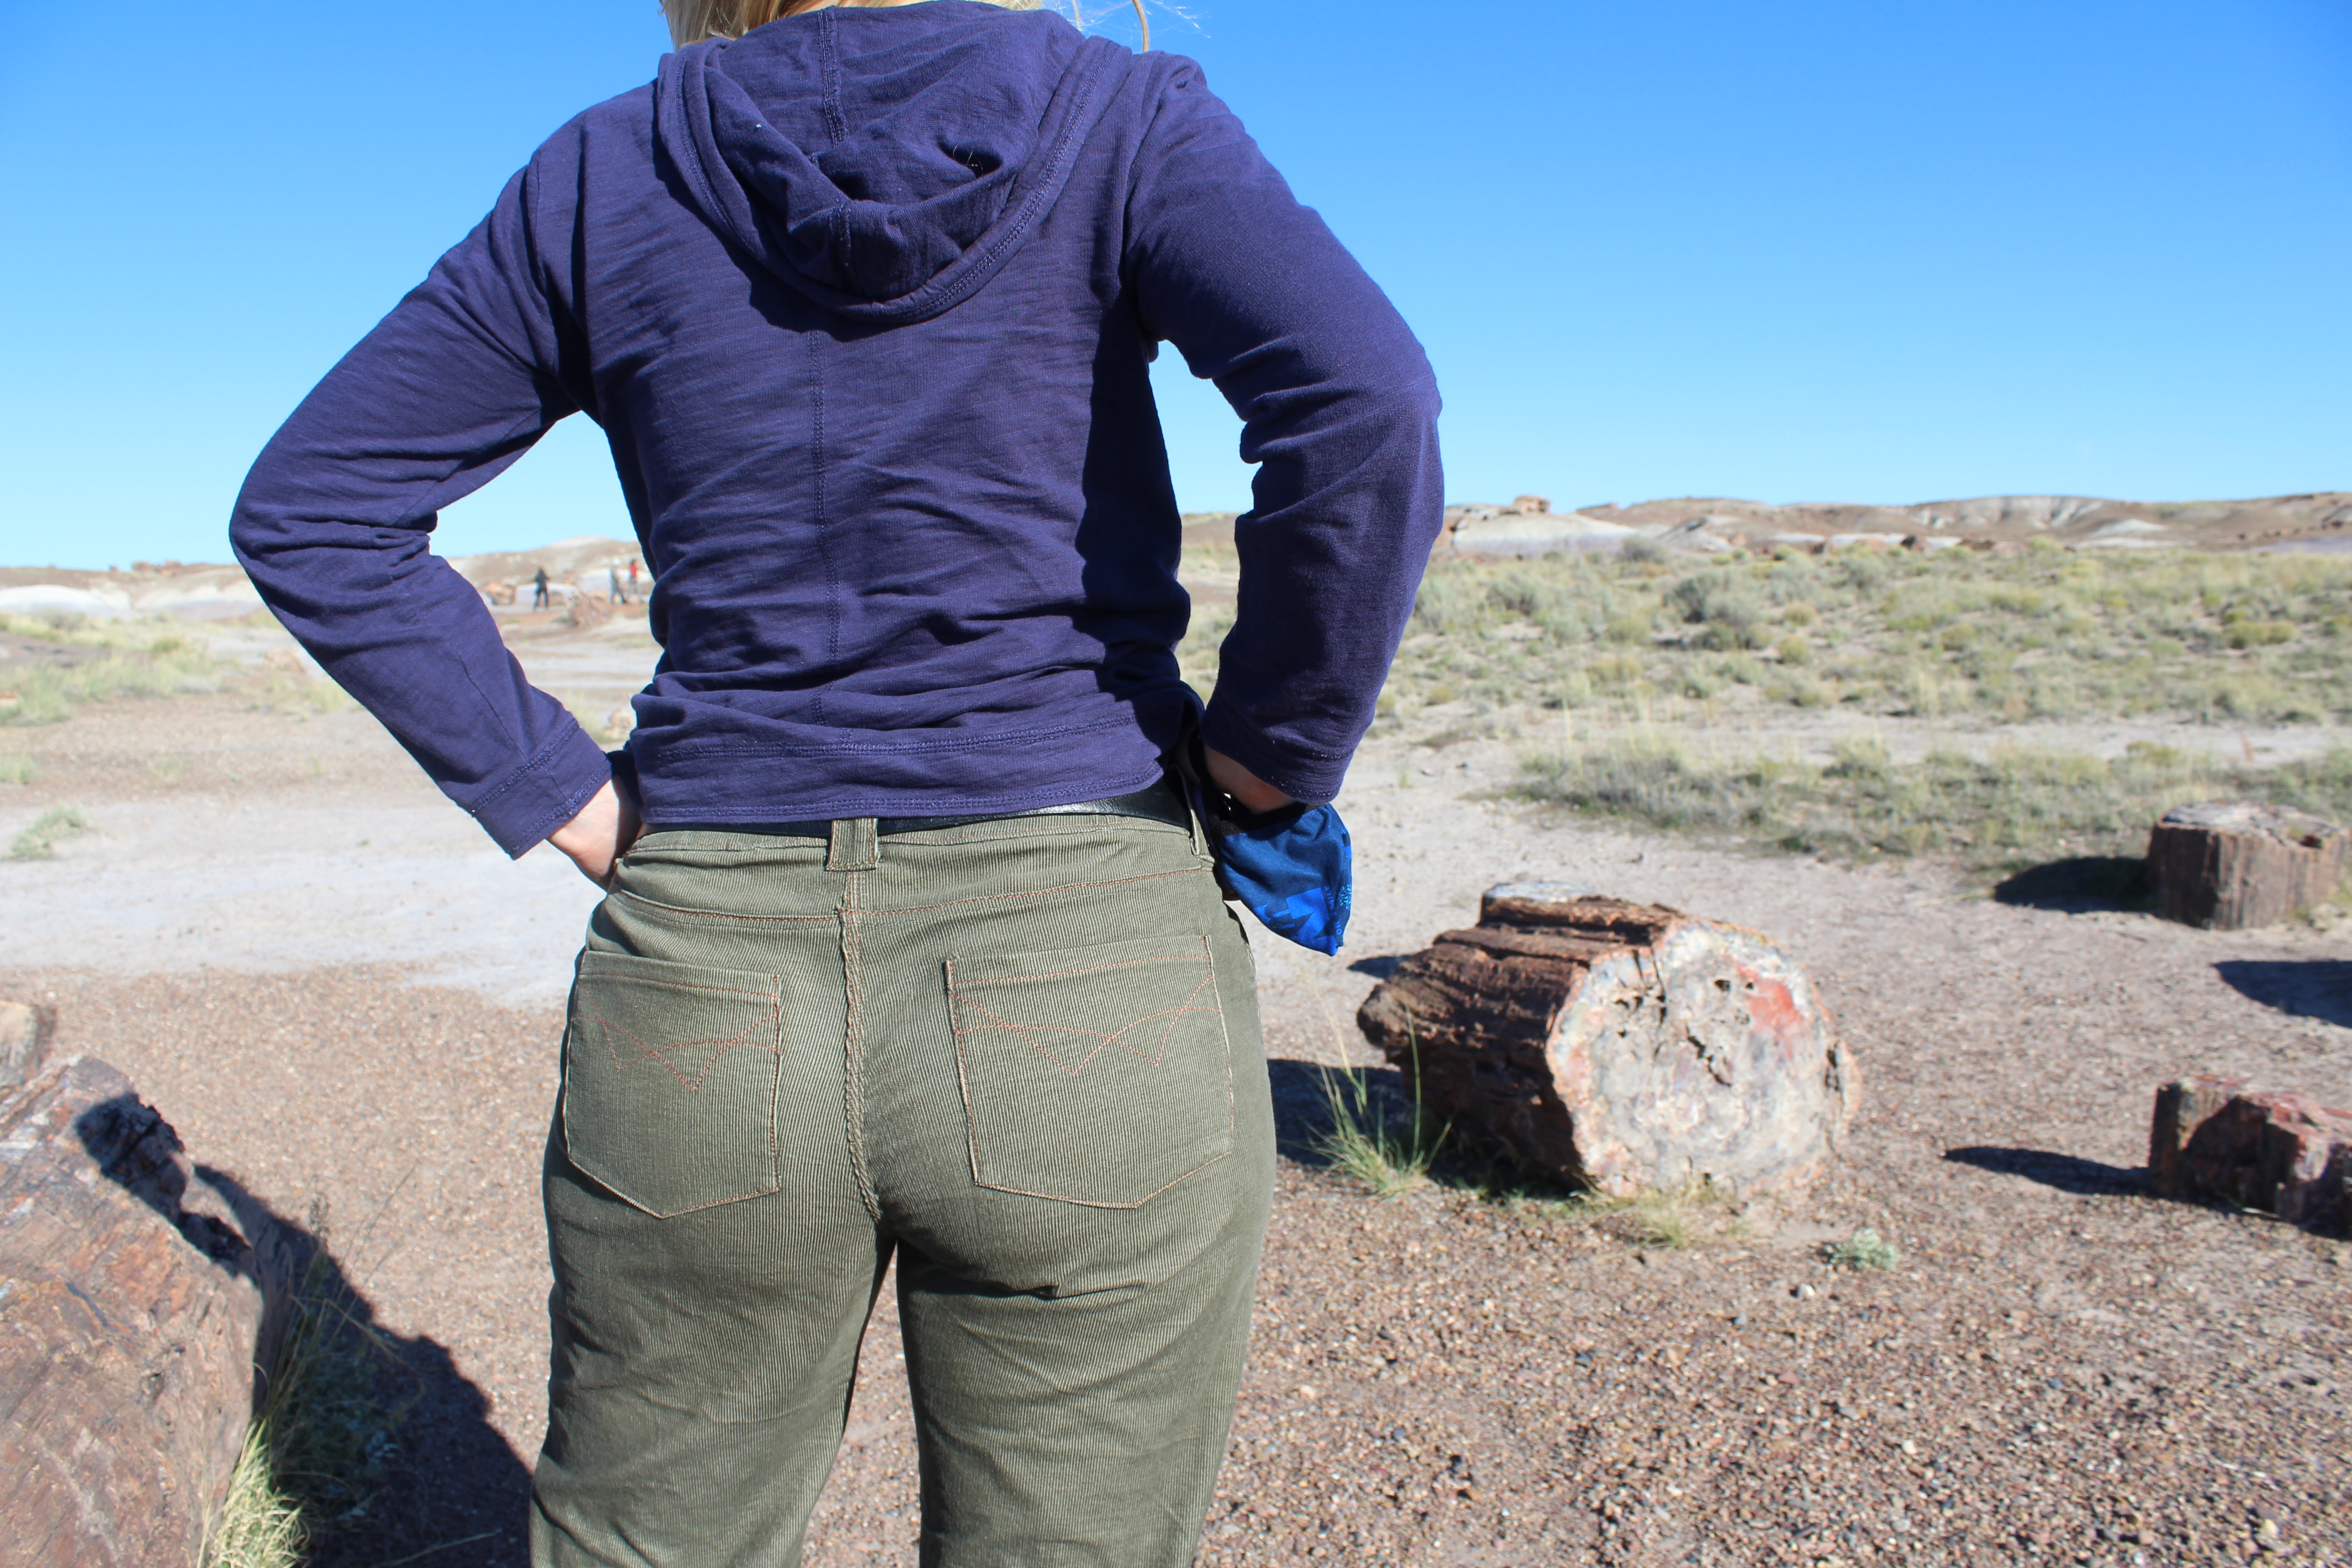
These look like real pants, and I even wore them on my major vacation last fall. There are things I really love about these corduroys: the clay-colored top stitching looks pretty sharp, the flat-felled seams came out mostly great and the back pockets look really well done. Unfortunately, they are pretty big on me. With a belt they somewhat work, but its not the most comfortable thing to wear. I had cut these out a year or so before I sewed them, so it was a combination of me being a little bigger then and also my overcompensating nature being afraid they wouldn’t zip up.

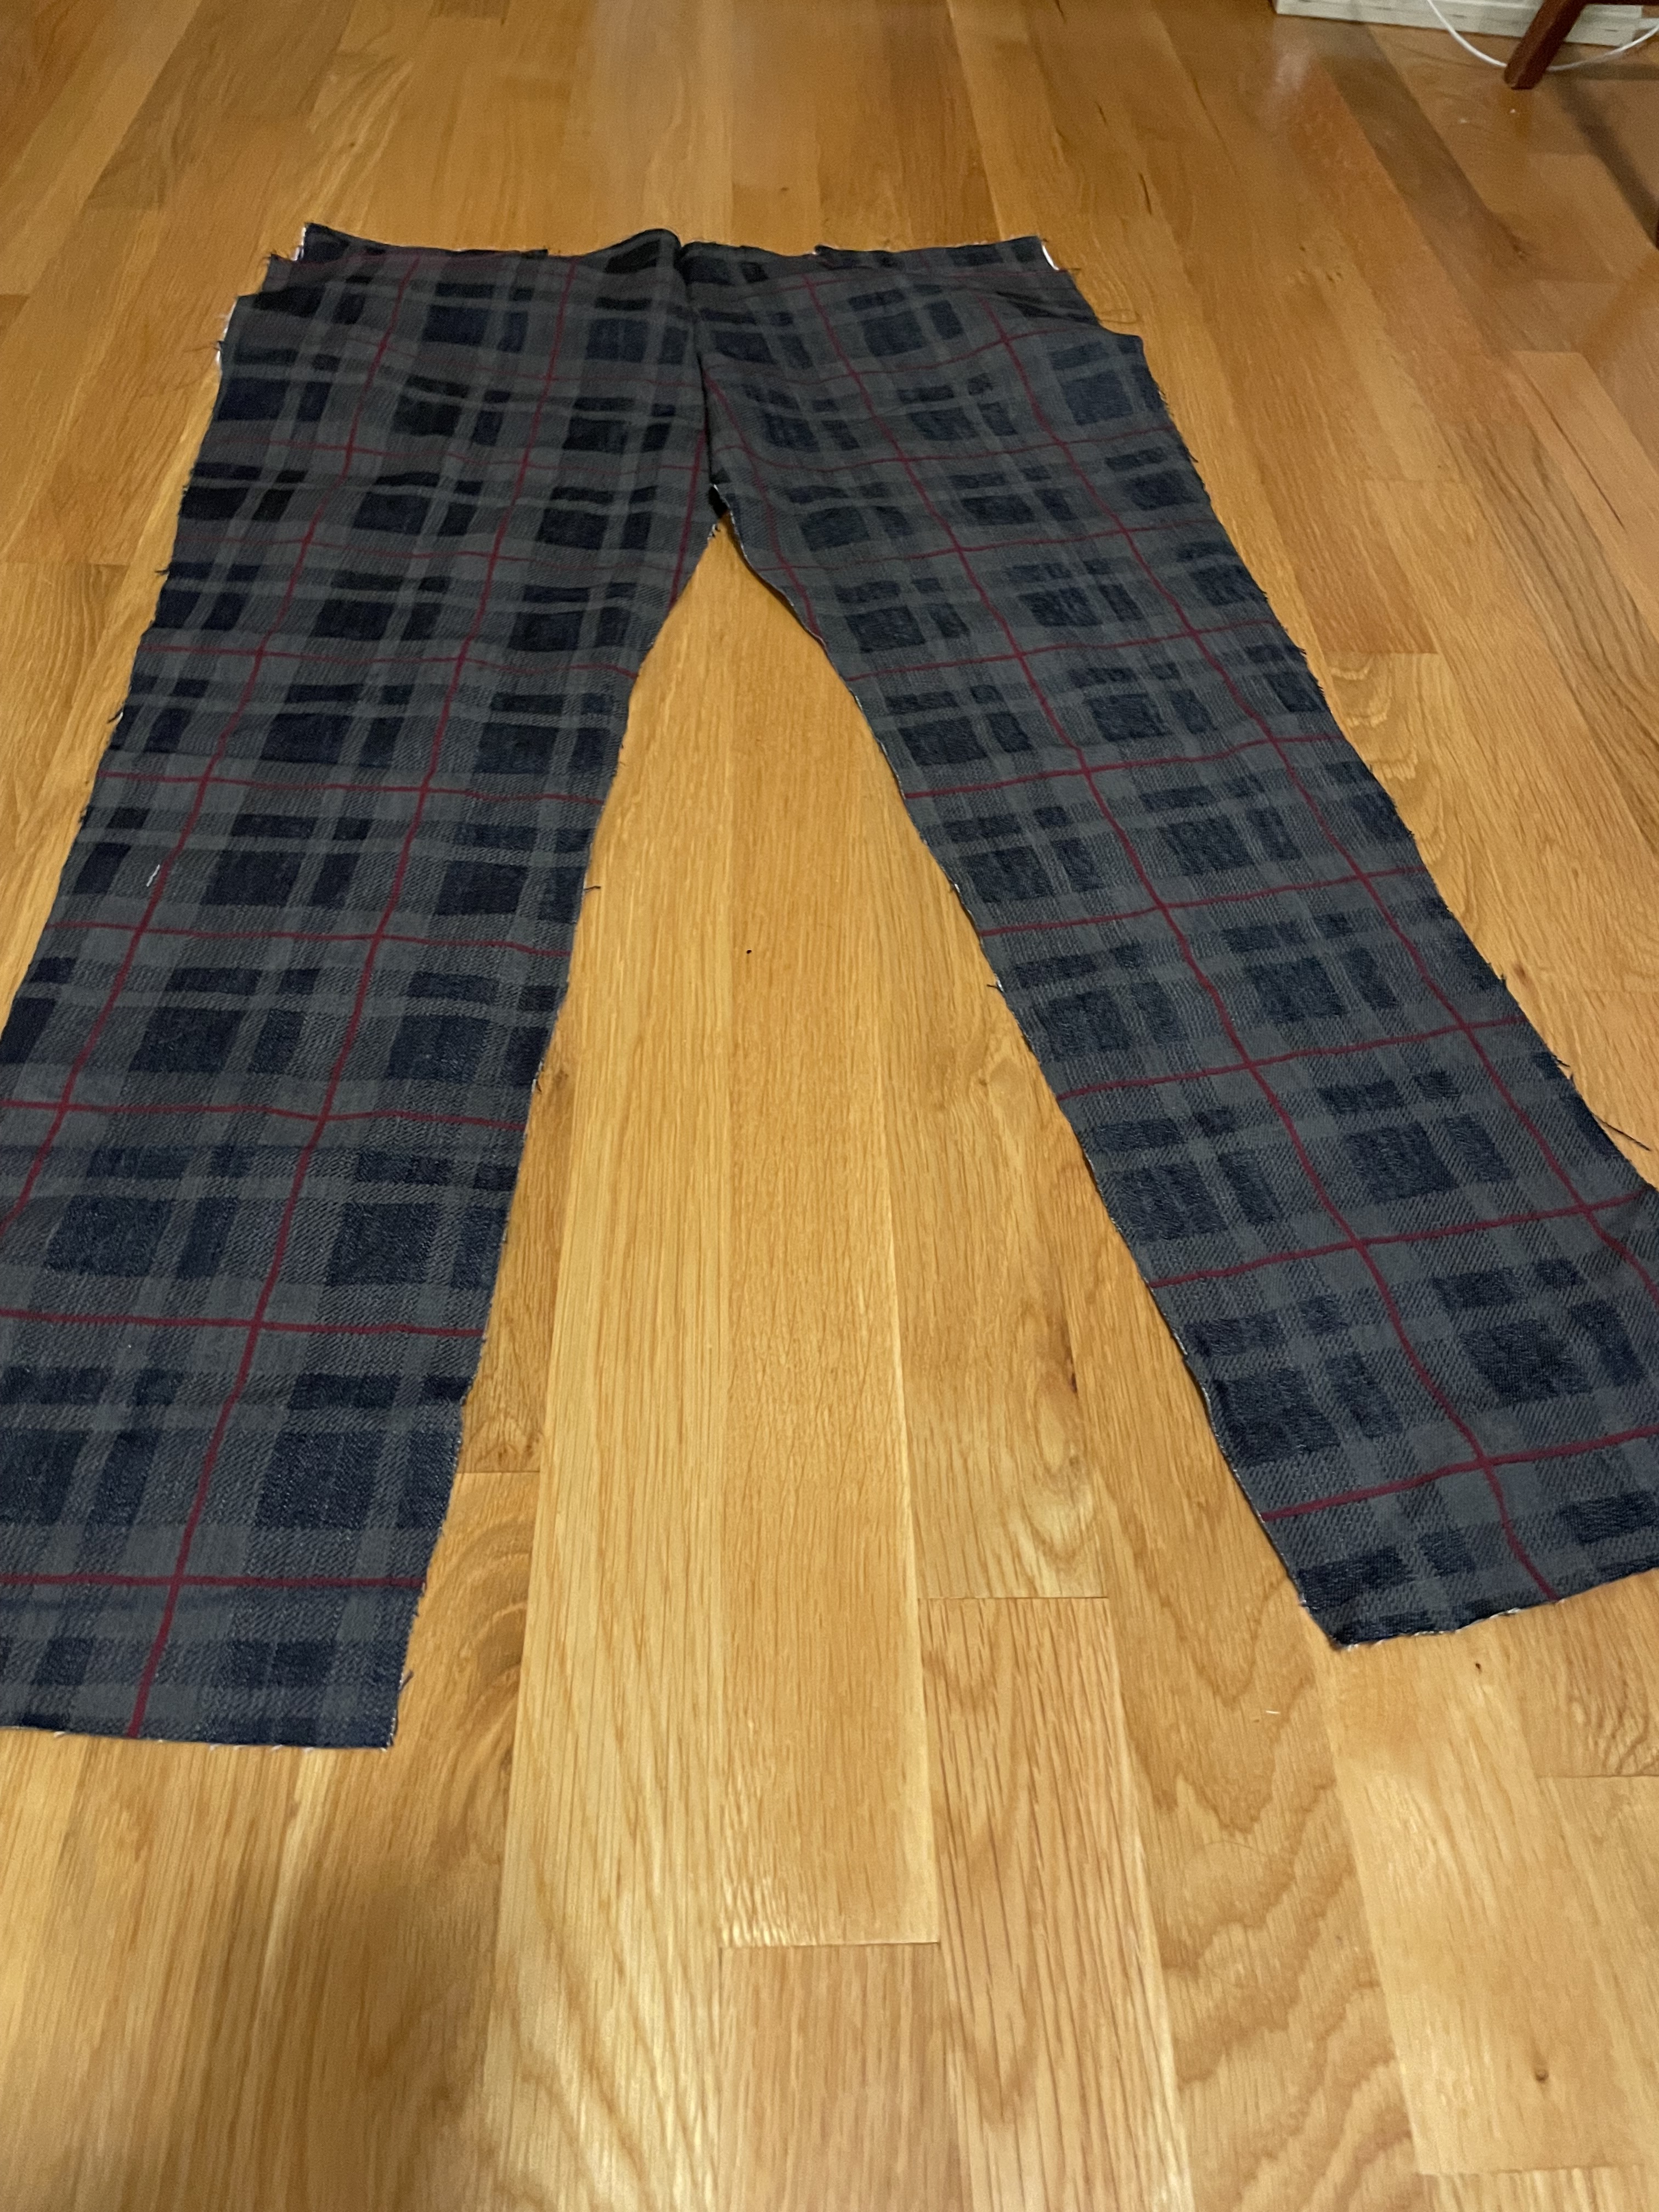
This time around, I have stretch denim to test out! I bought this pretty cheap at Sewfisticated awhile back, so I feel like it’s good for a test run. What didn’t cross my mind was that all that plaid would need to be matched. D’oh! Well it’s good practice I guess.

Because I have some stretch, I can use the Ginger Jeans pattern from Closet Core. So far I’m loving this pattern. The instructions are so much better than my previous patterns and it actually tells you how to finish your seams for a professional look, which is something those big pattern companies just don’t do. This can be hard when you are a sewing novice because you have to figure out how it all works ahead of time, usually by looking up other people’s projects. I haven’t gotten too far on these, mostly just some topstitching. I’m just about ready to install the zipper, which should give me some clue how this is going to go. However the real test is always the waistband – I feel like this is where it can all fall apart for me. Wish me luck as I feel like I’m flying by the seat of my pants on this one – literally!

Pingback: Take Two for 2022: The problem with pants pt. 3 – Threading Lightly
Pingback: Take Two for 2022: My little brown clone – Threading Lightly
Pingback: Take Two for 2022: The problem with pants pt. 2 – Threading Lightly